

TigerWraith
-
Posts
18 -
Joined
-
Last visited
-
Days Won
12
TigerWraith's Achievements
")


-
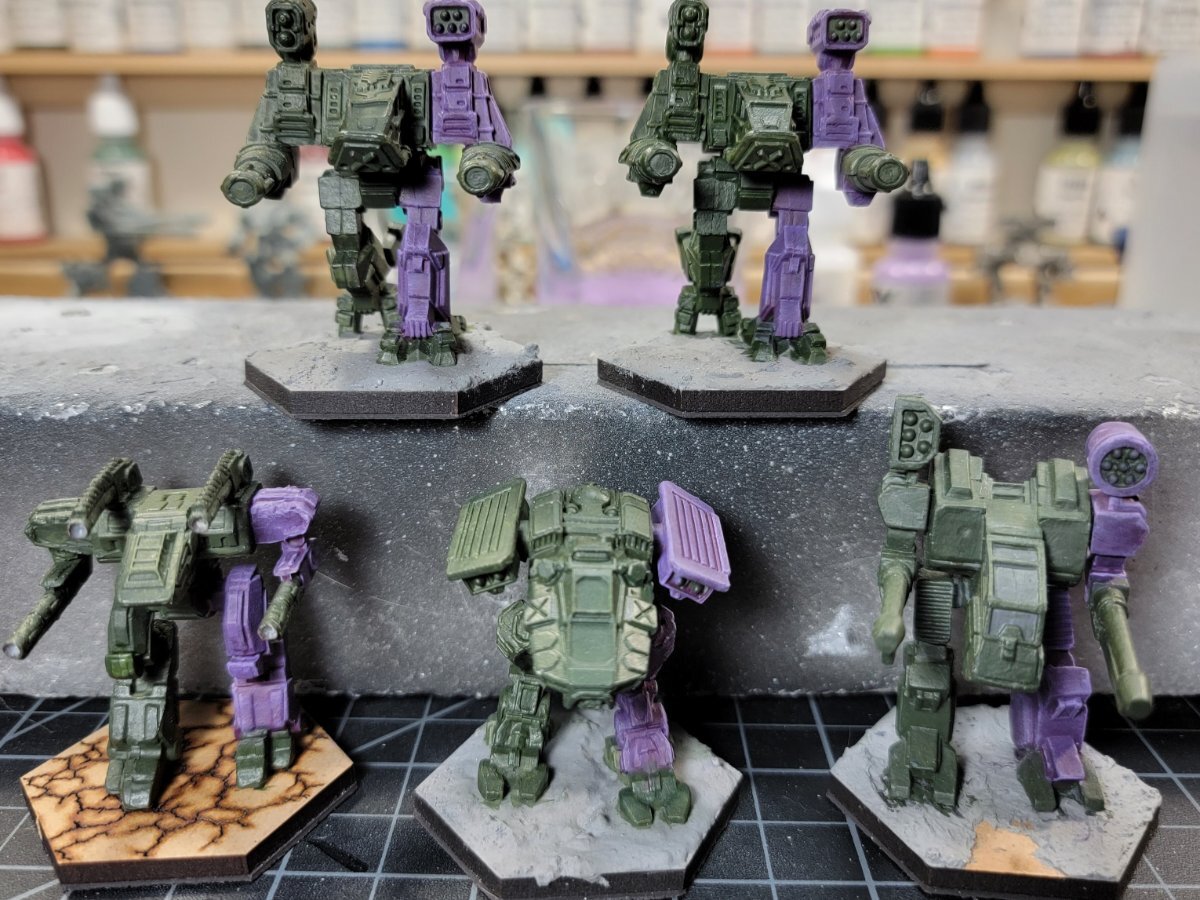
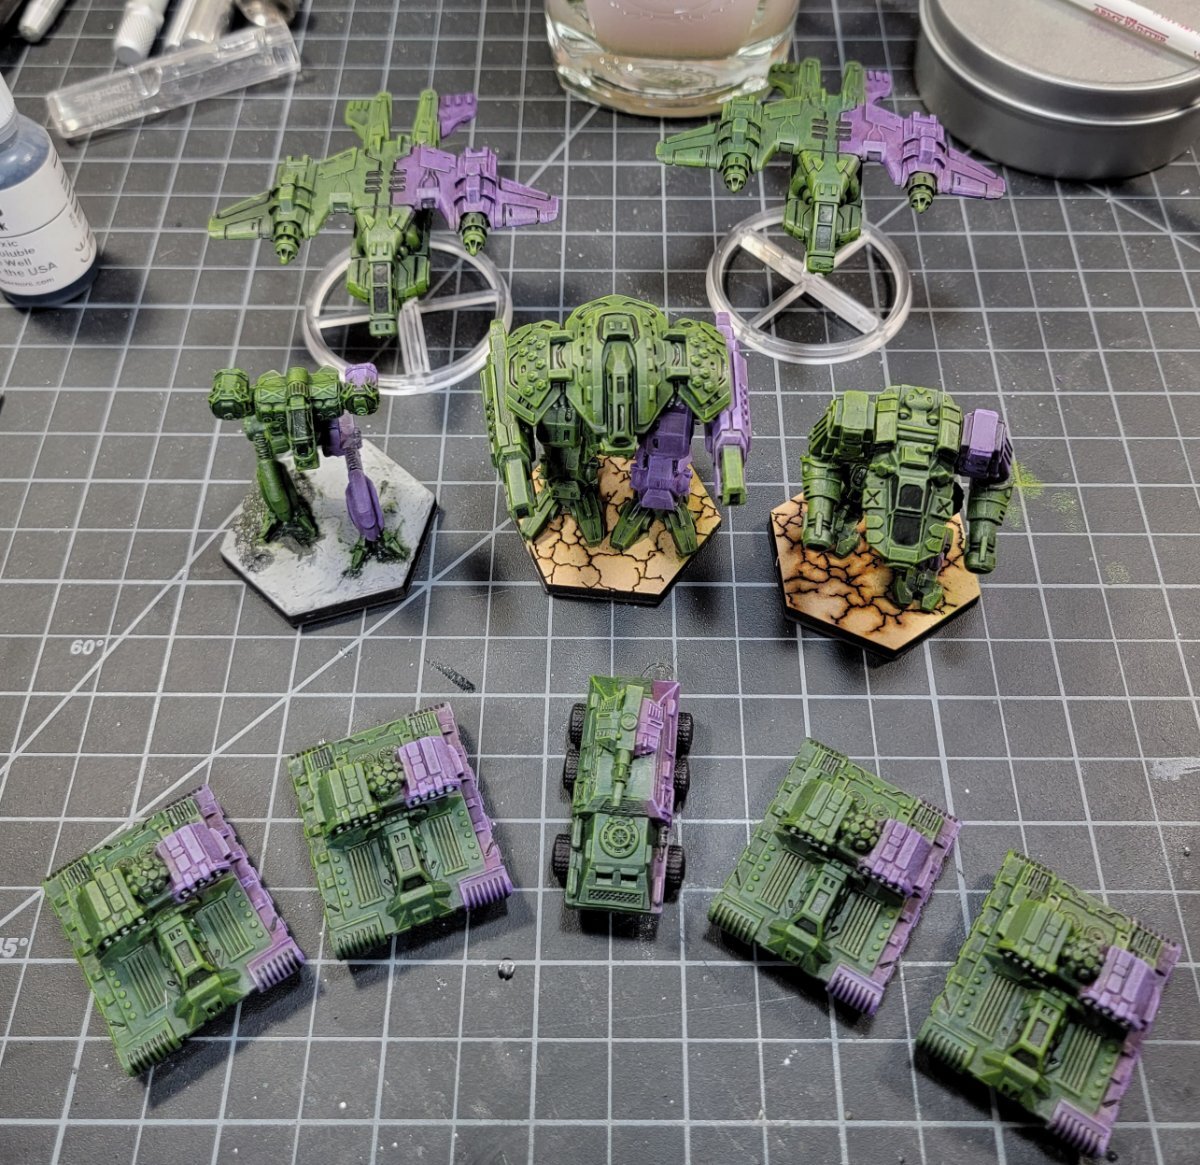
Malvernis unit in progress
TigerWraith replied to TigerWraith's topic in Works in Progress: Painting
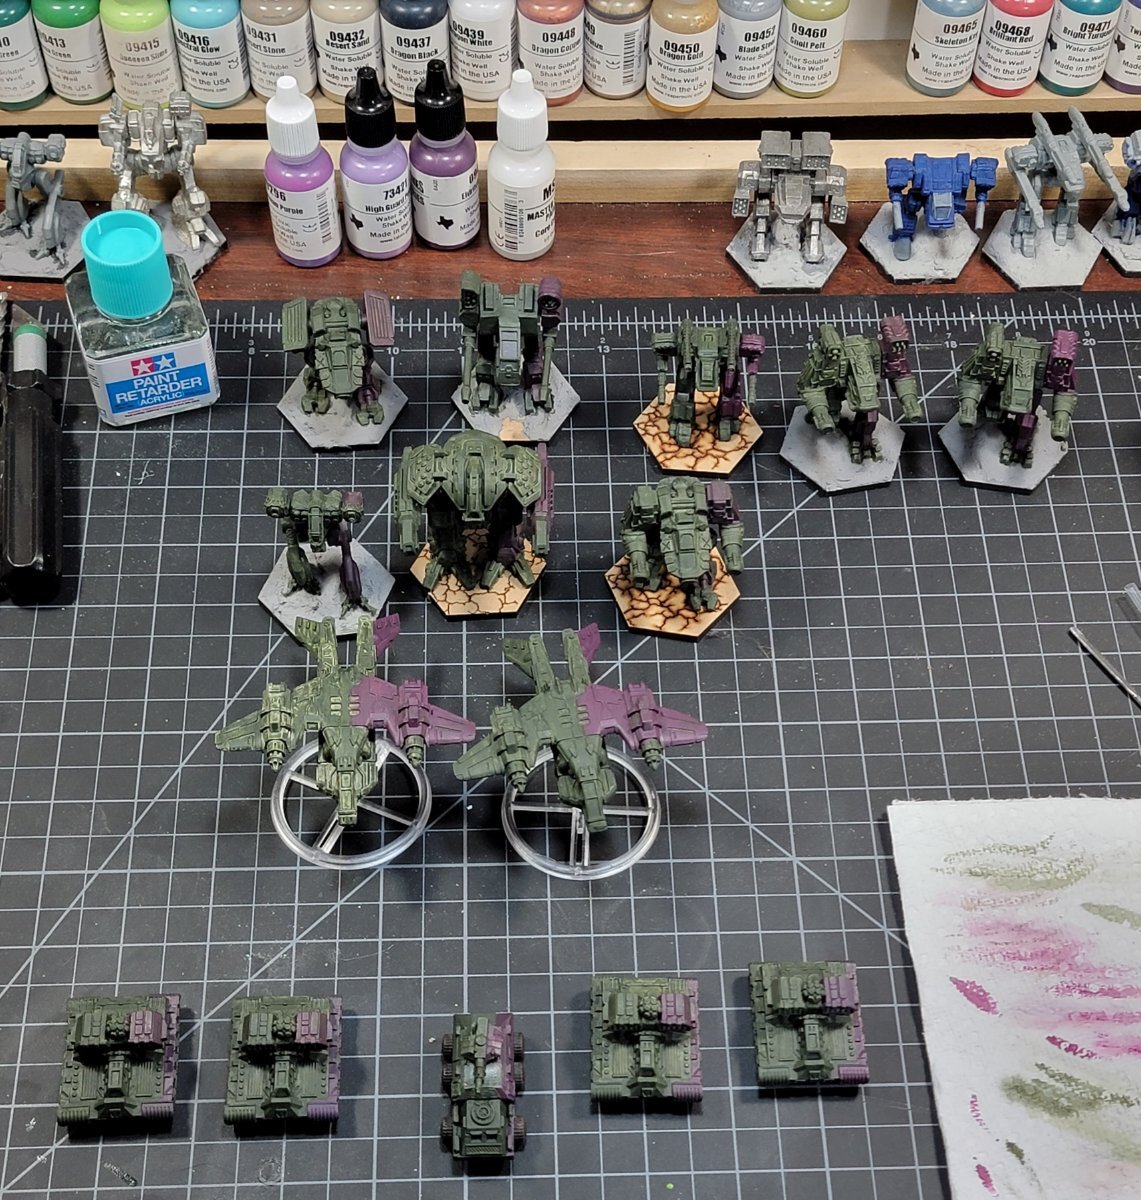
Well having to go back to the Specialist Squad, replacing the Pillager with a Reaver and Wight A. Both just got their base coats.
-
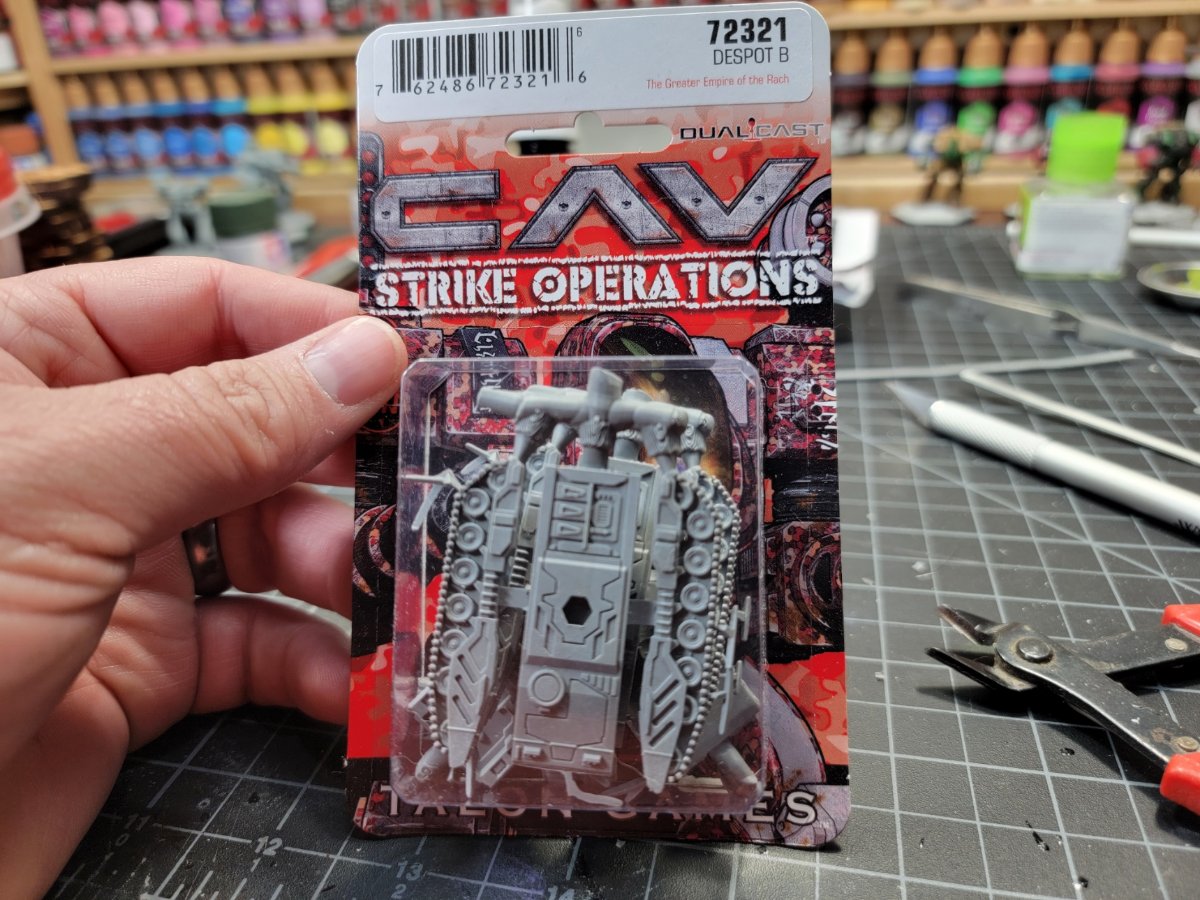
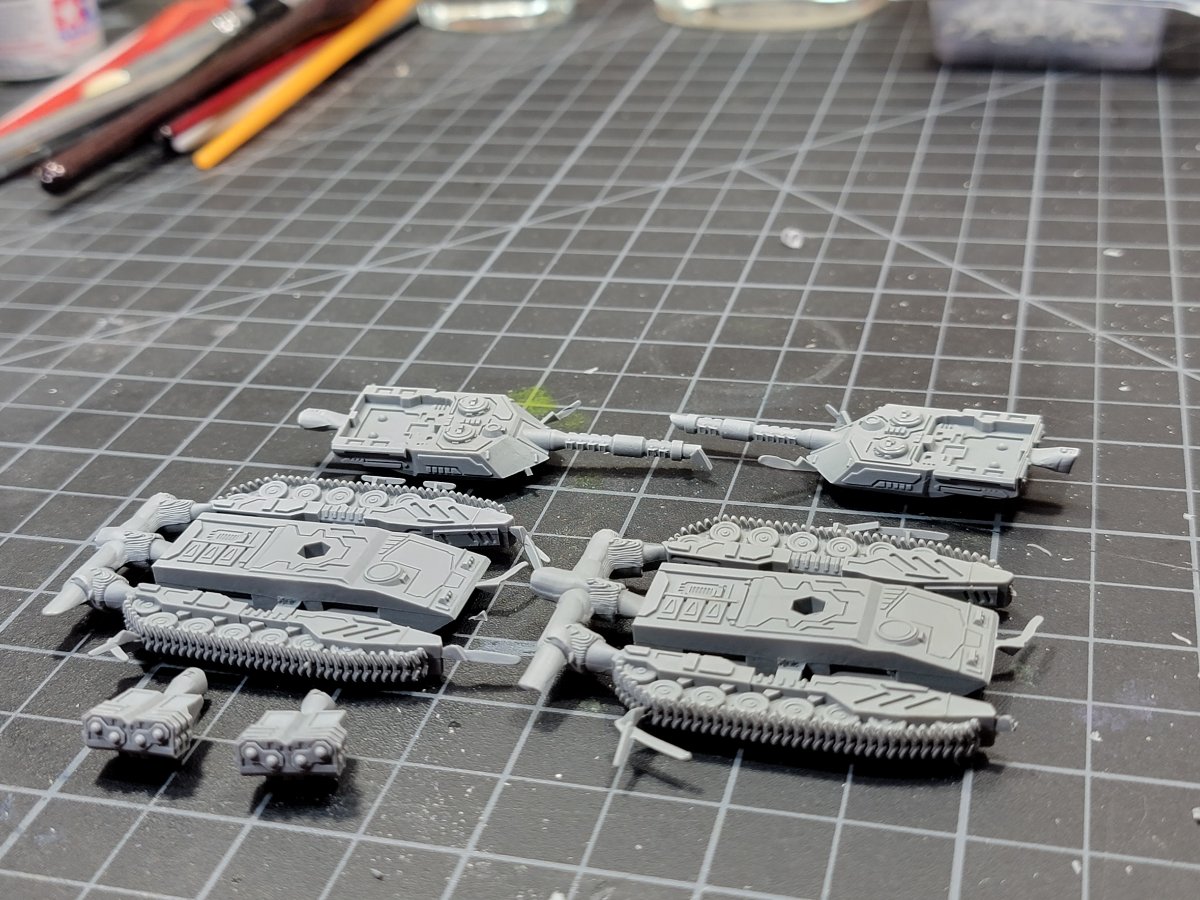
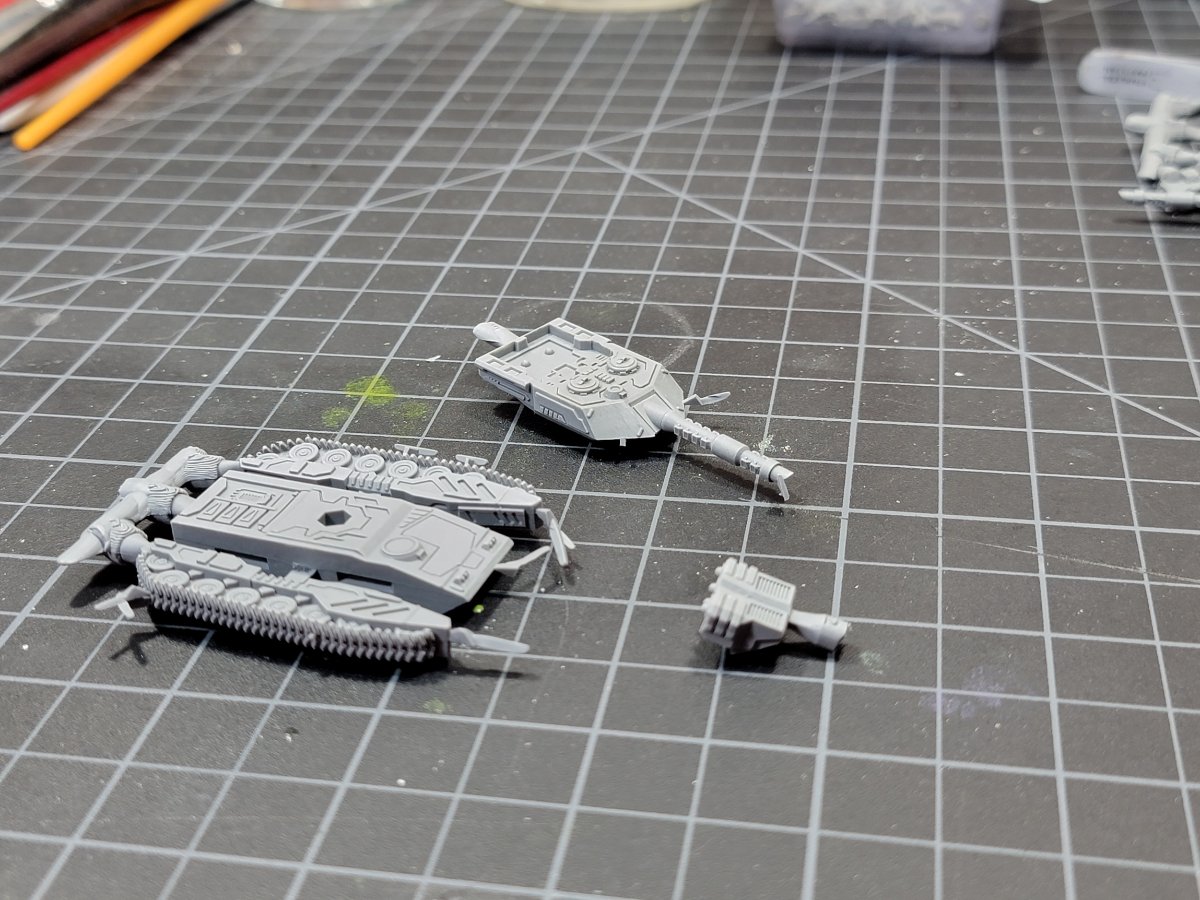
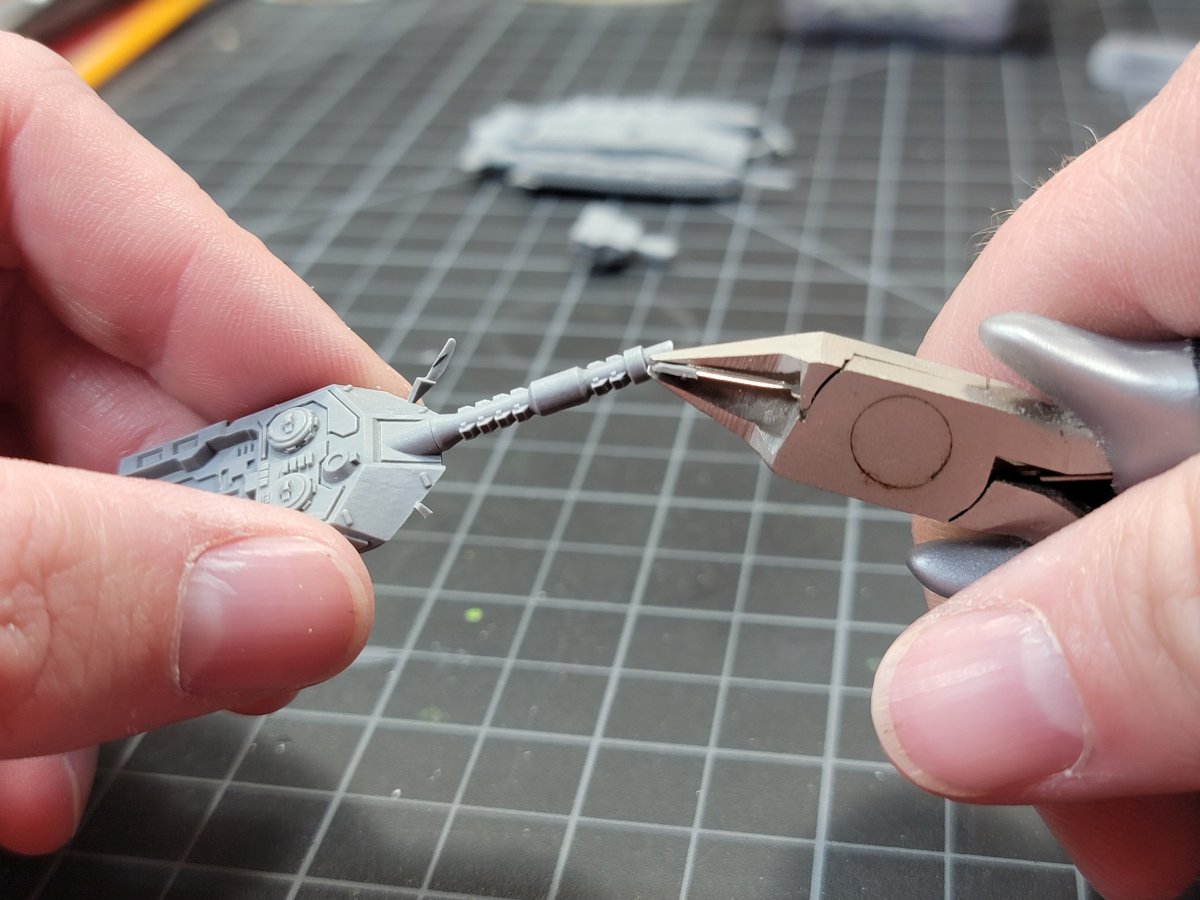
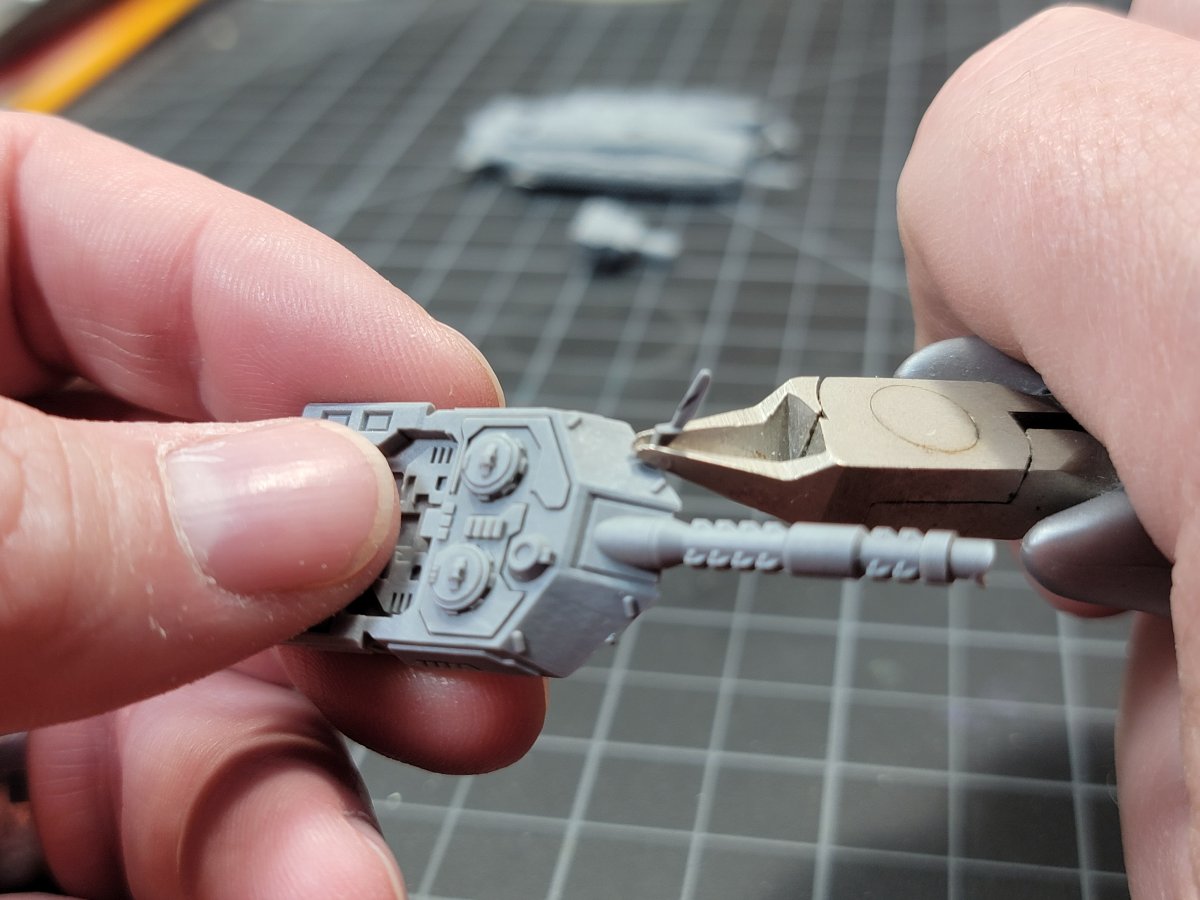
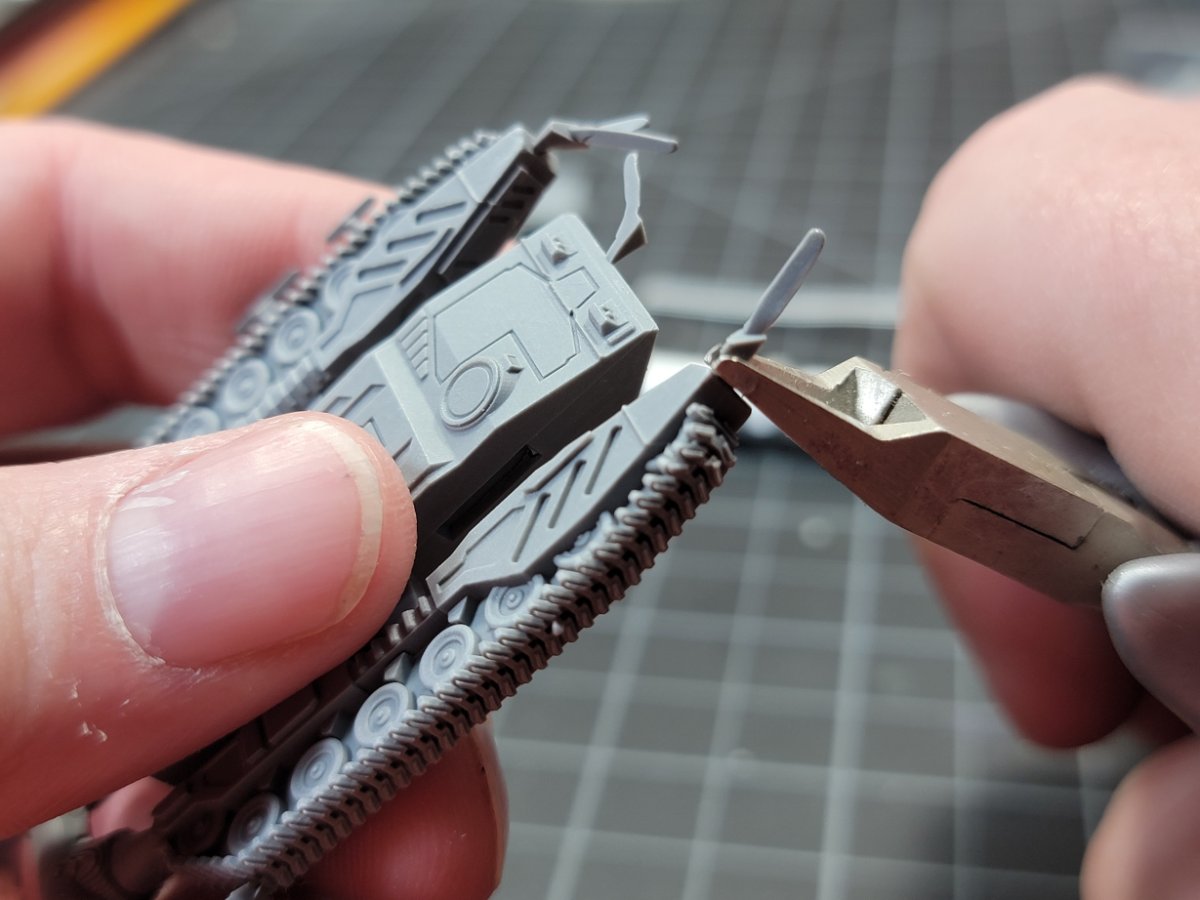
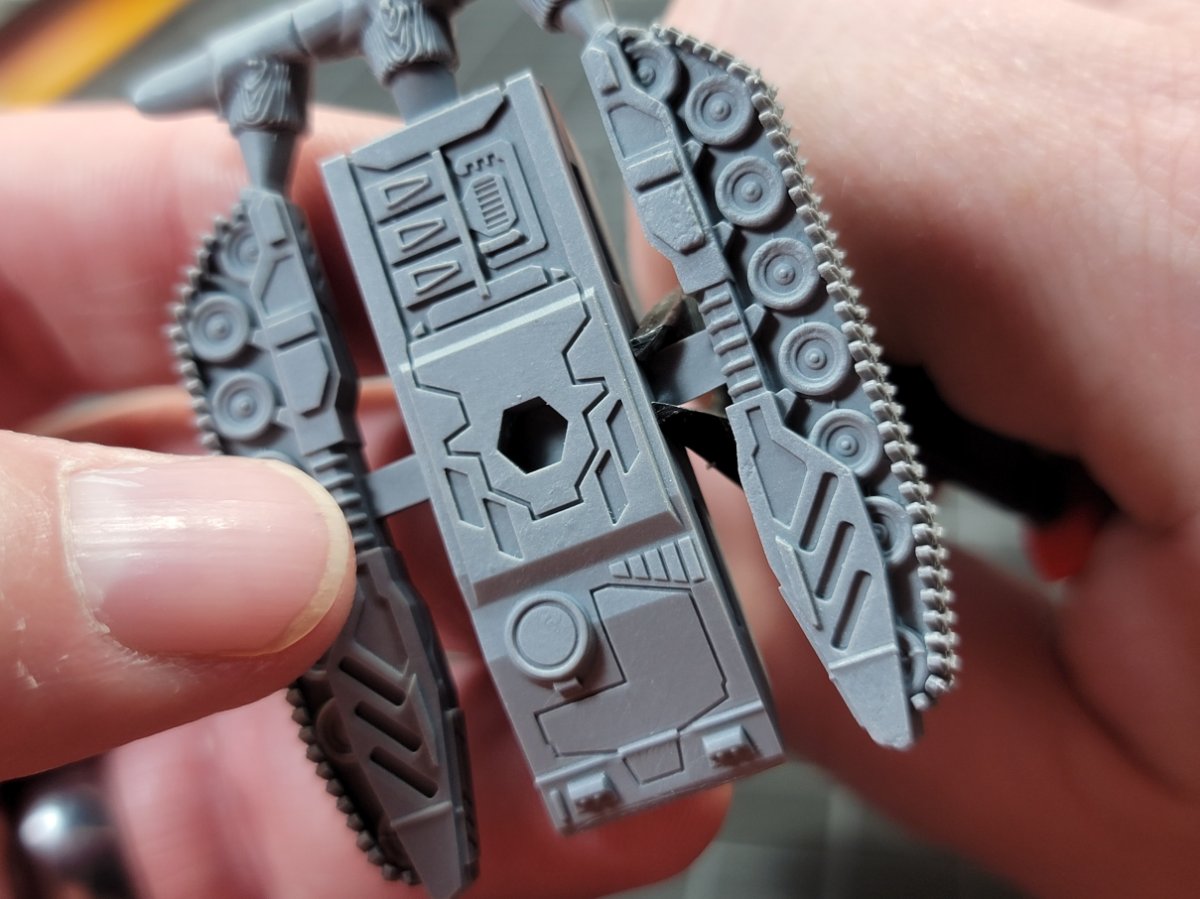
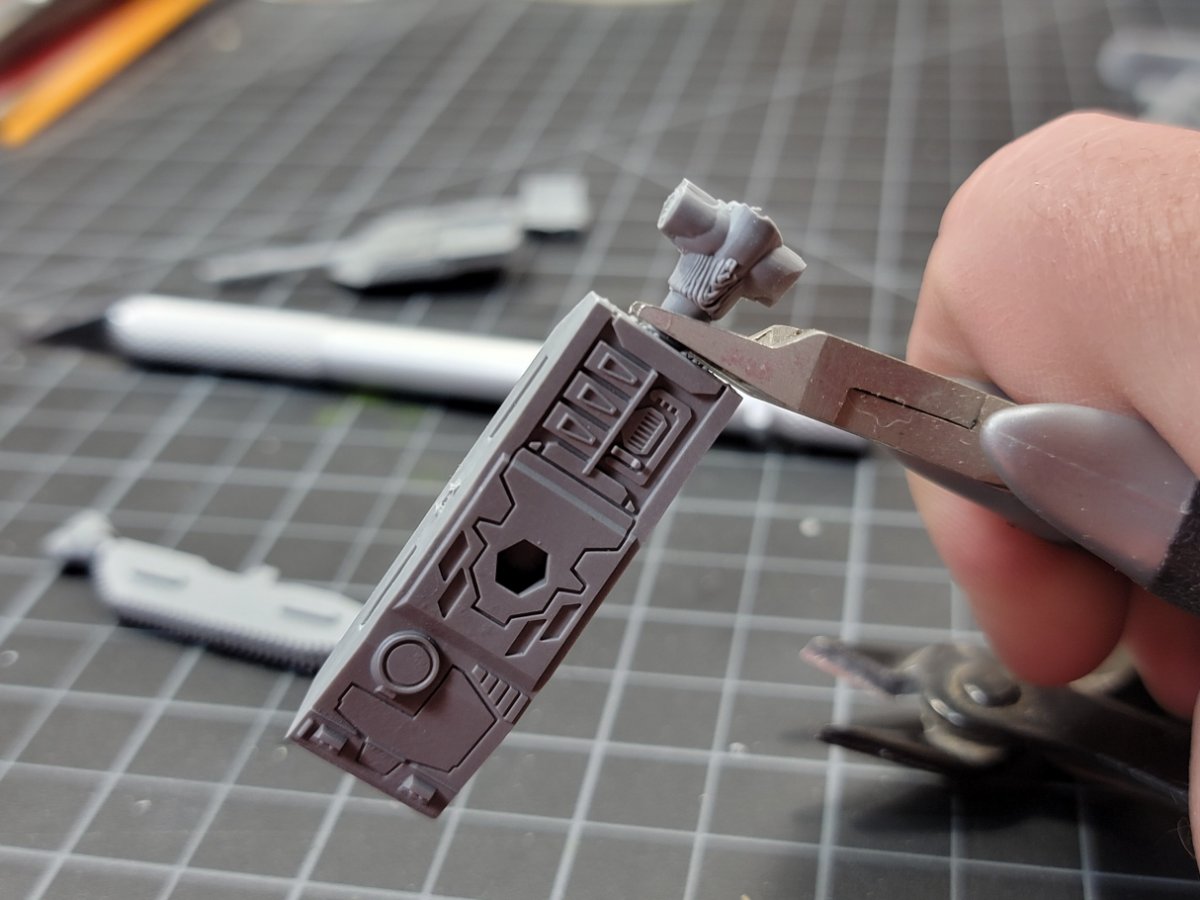
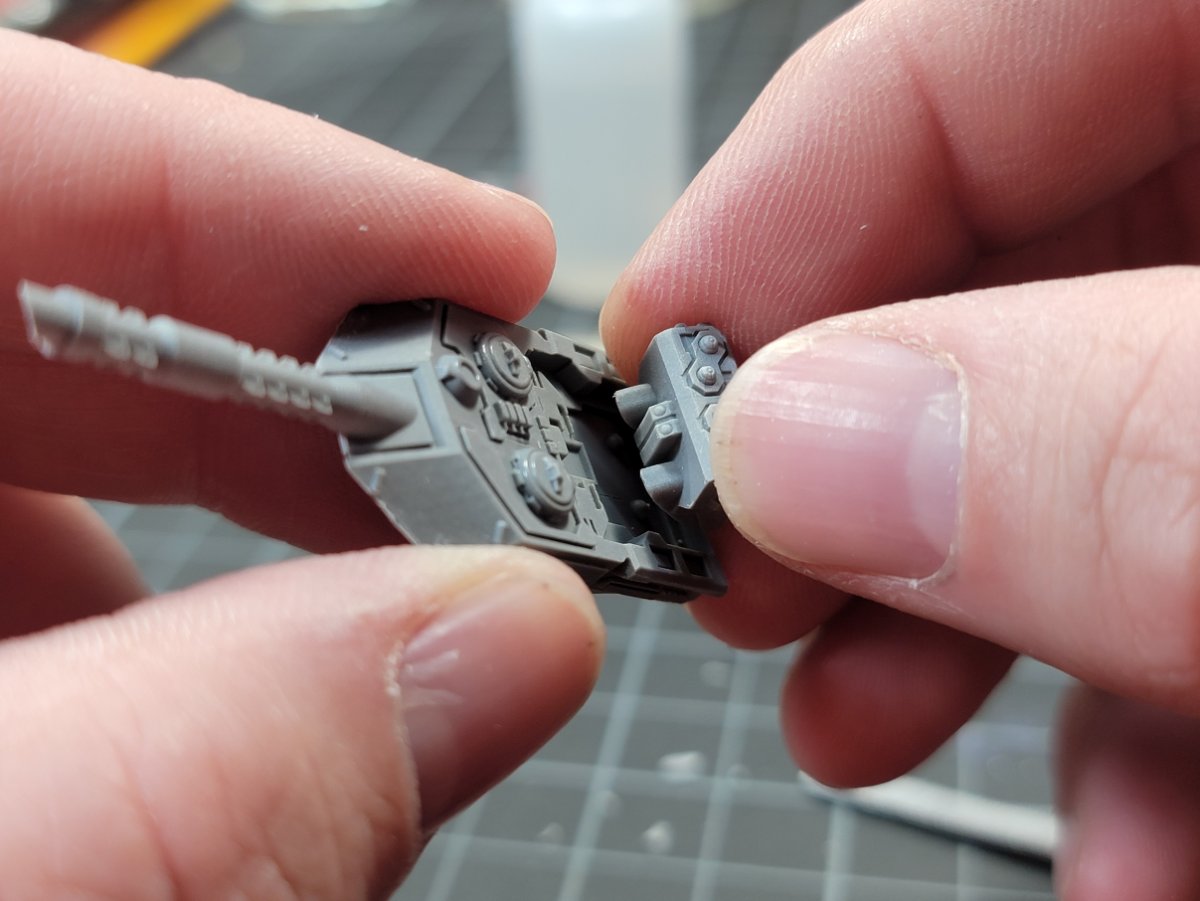
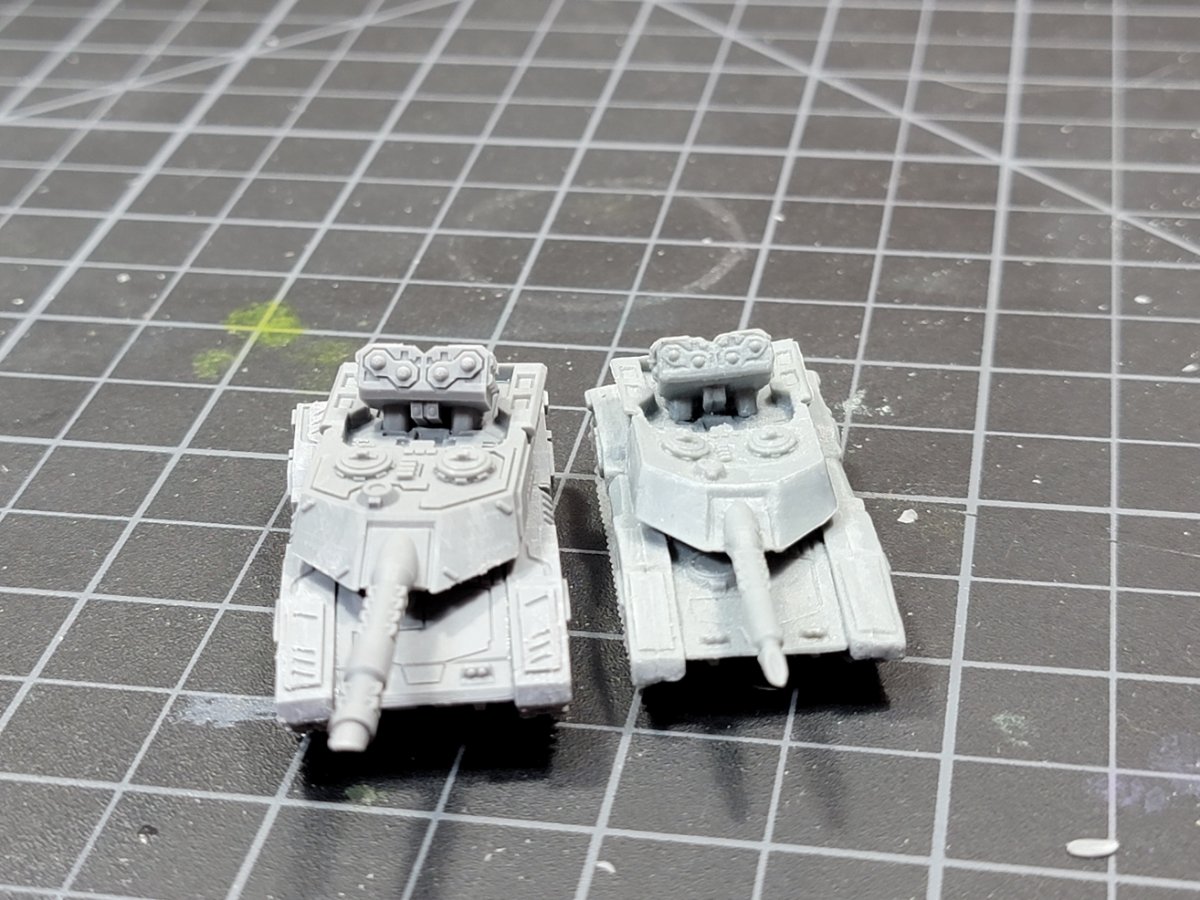
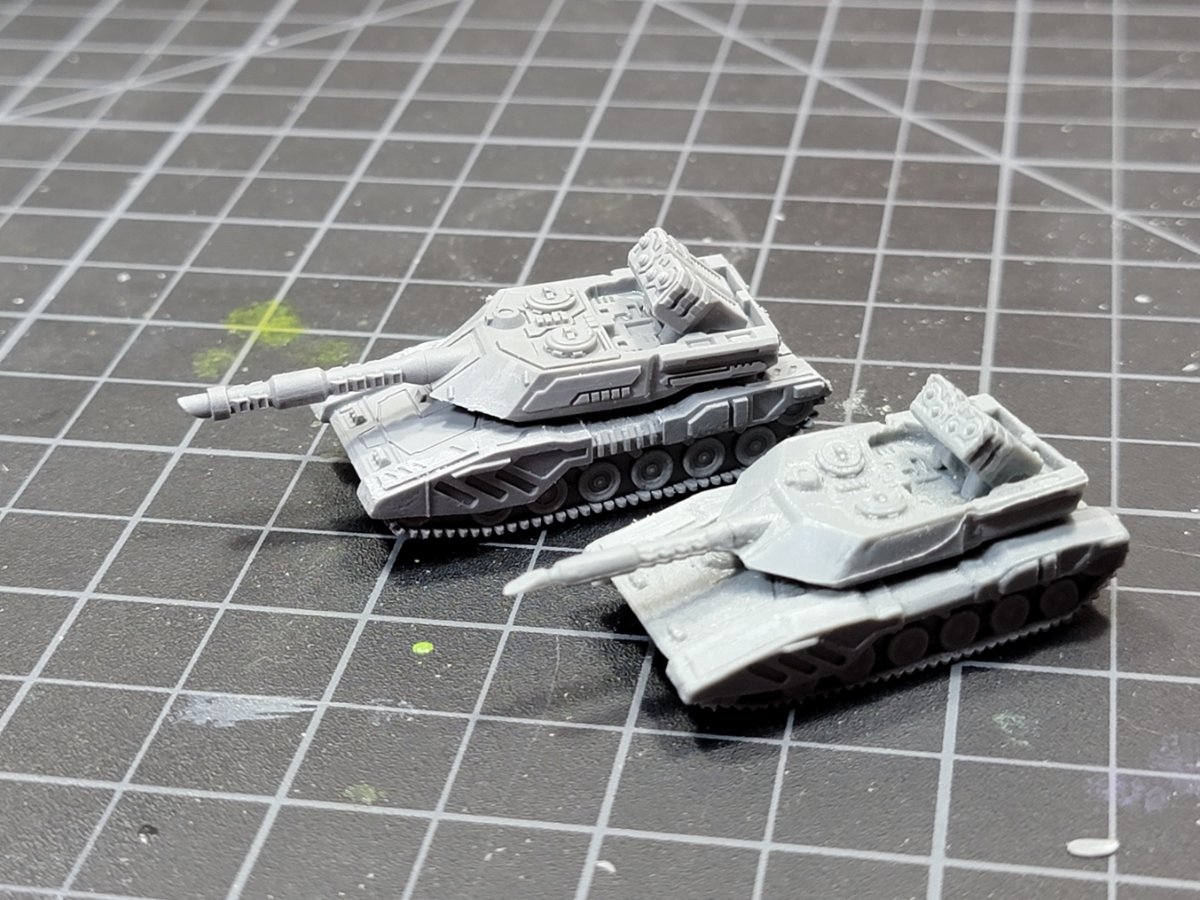
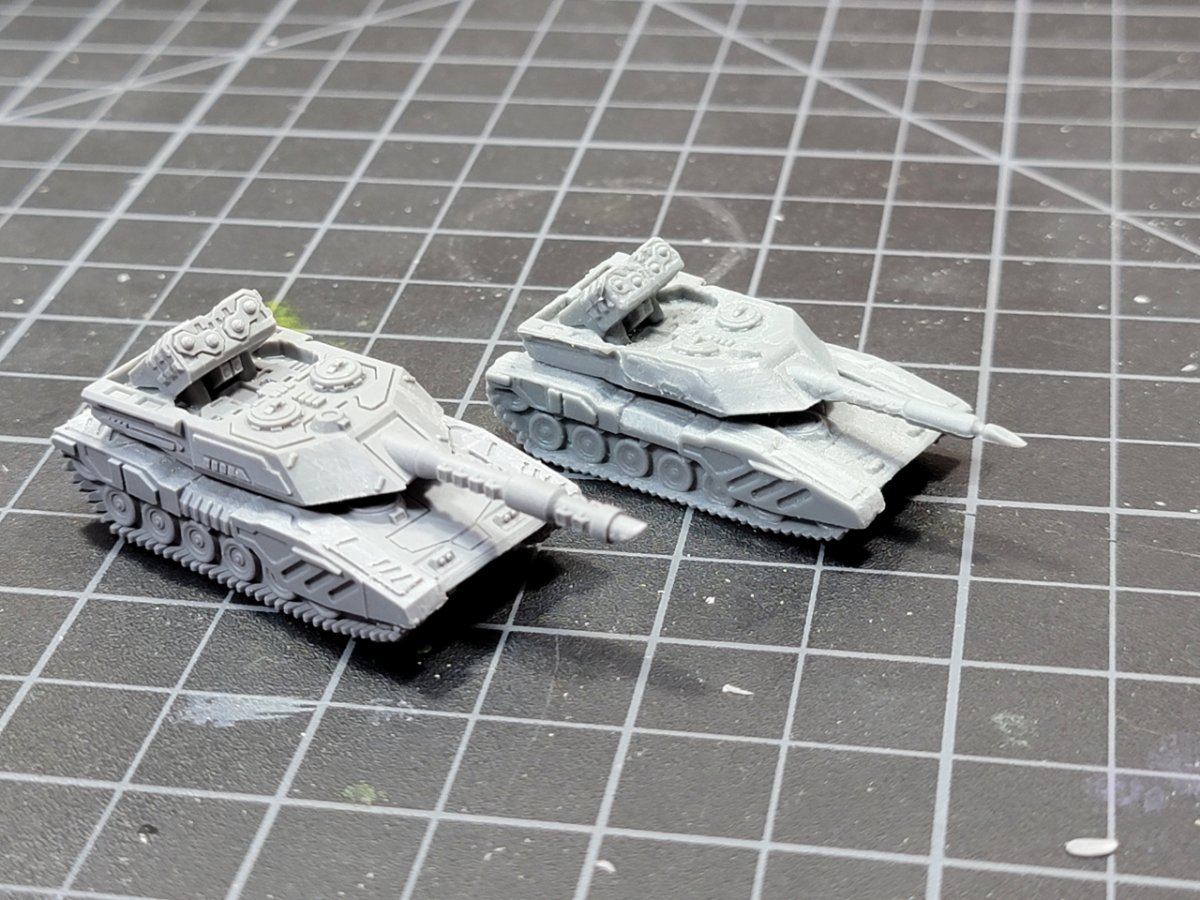
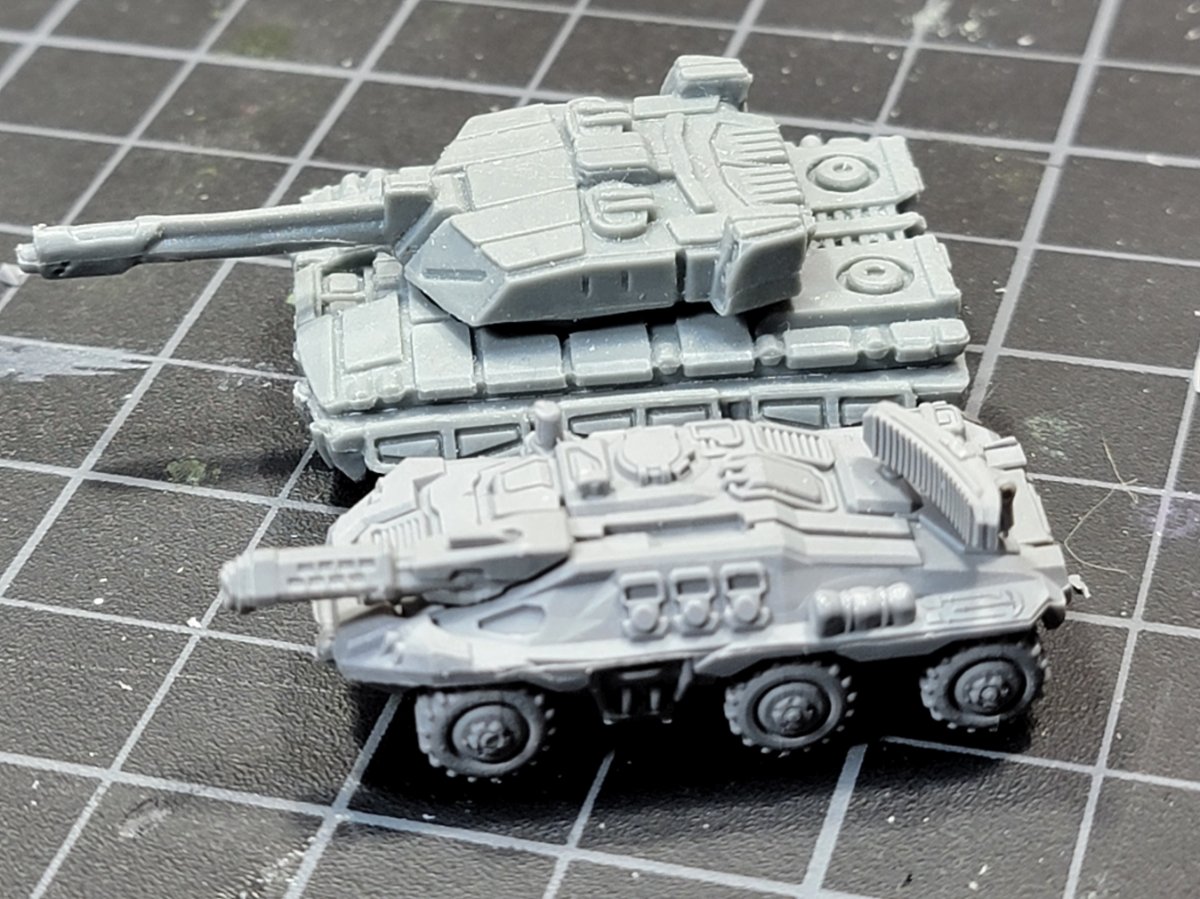
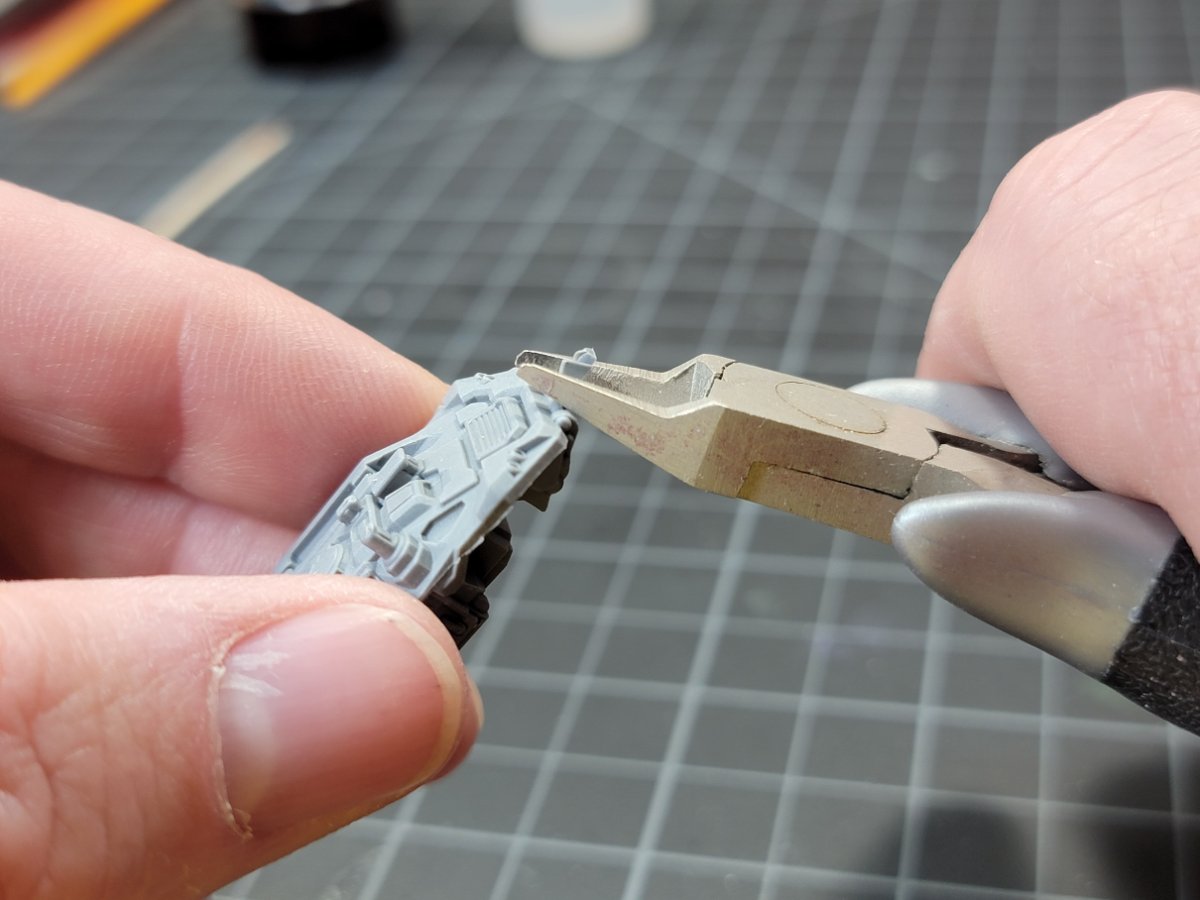
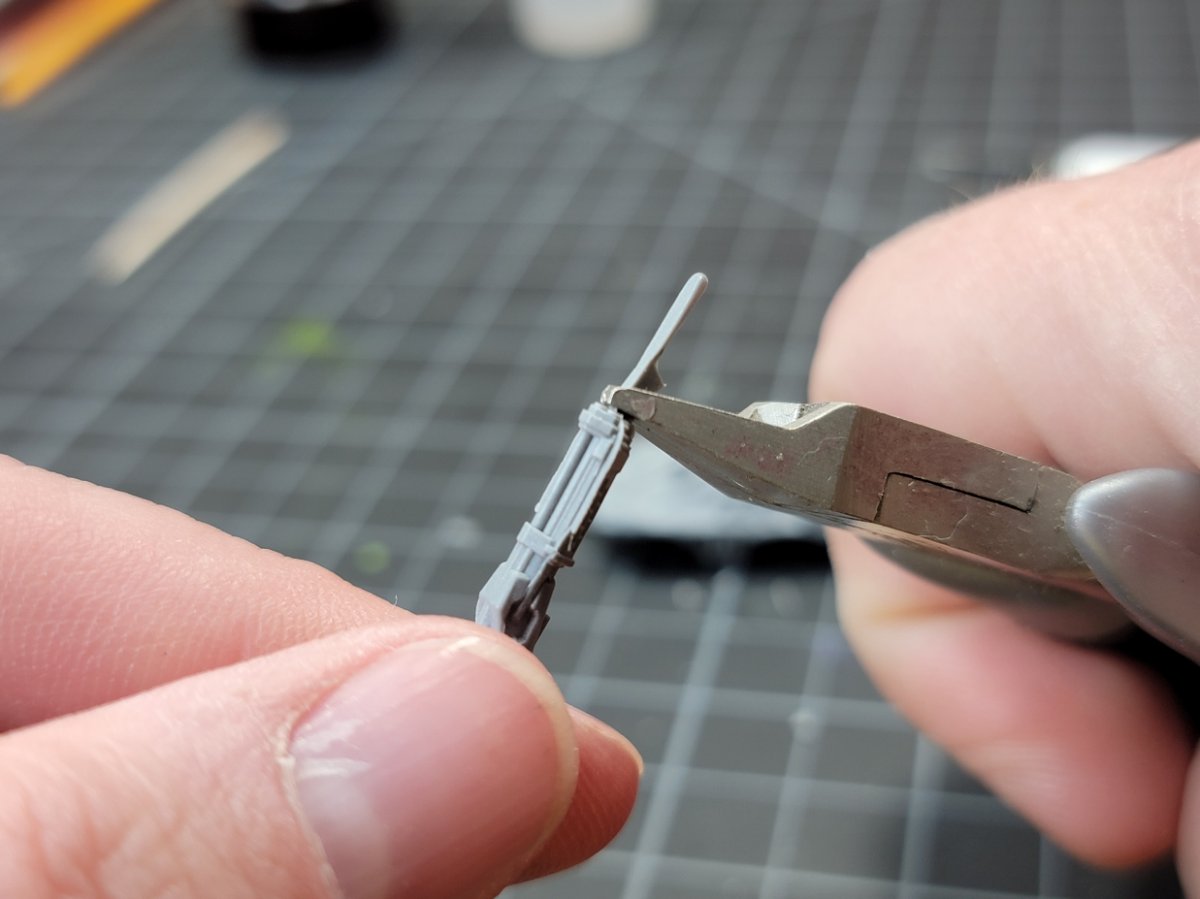
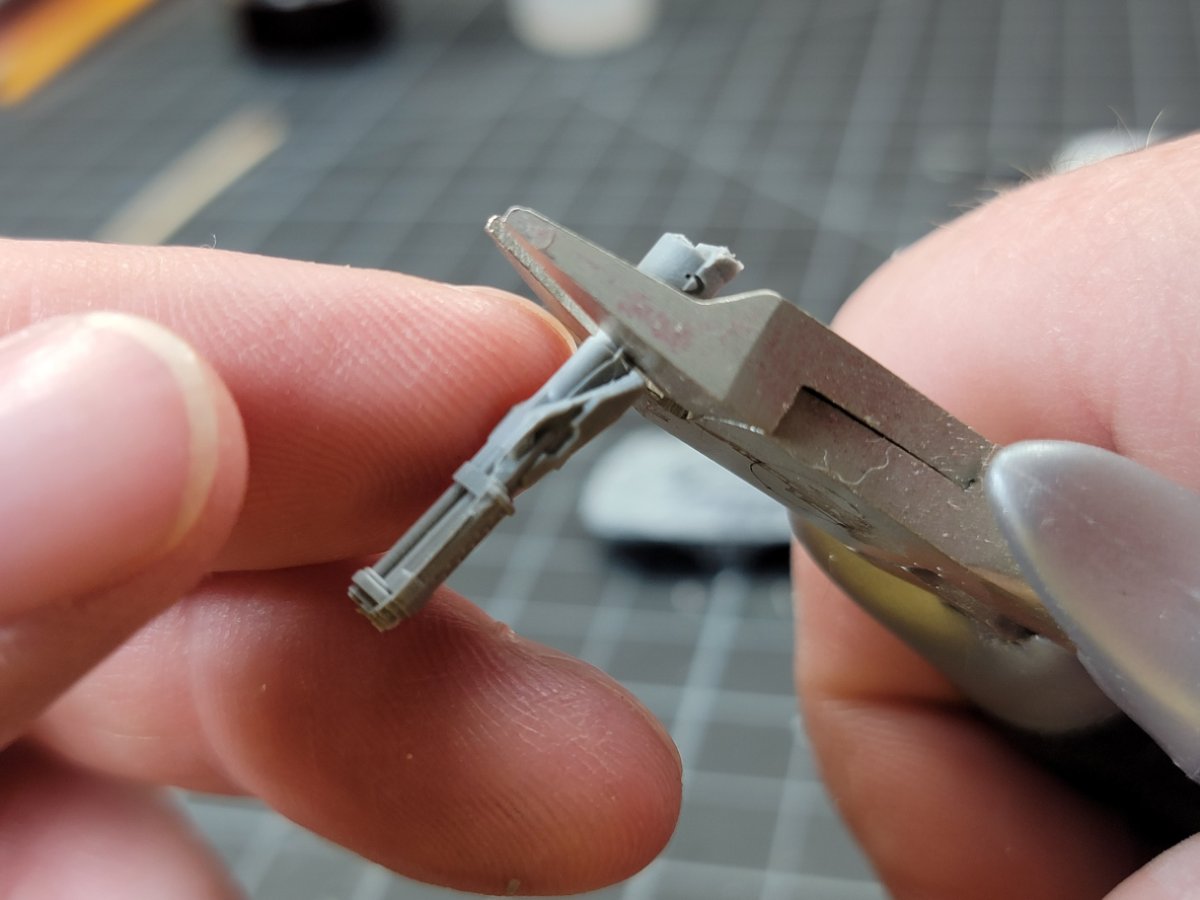
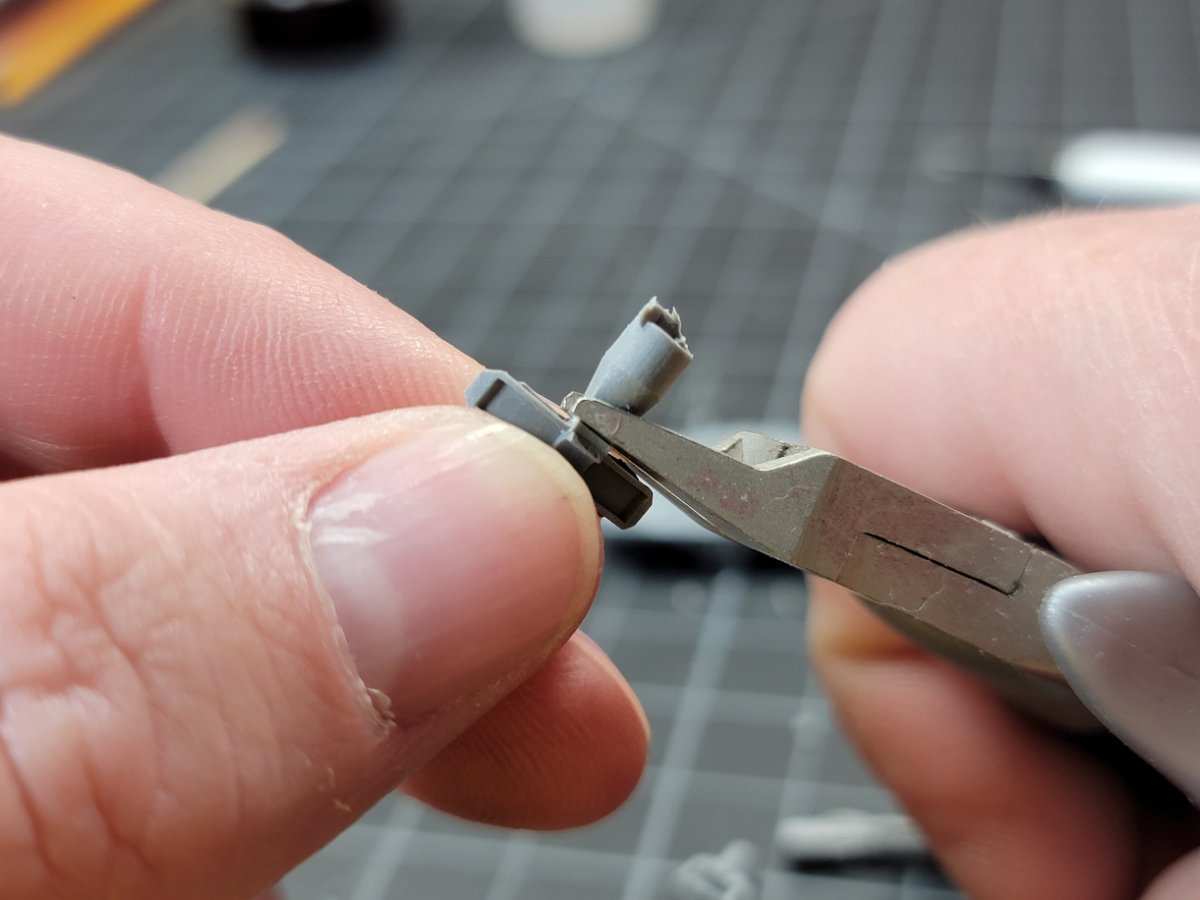
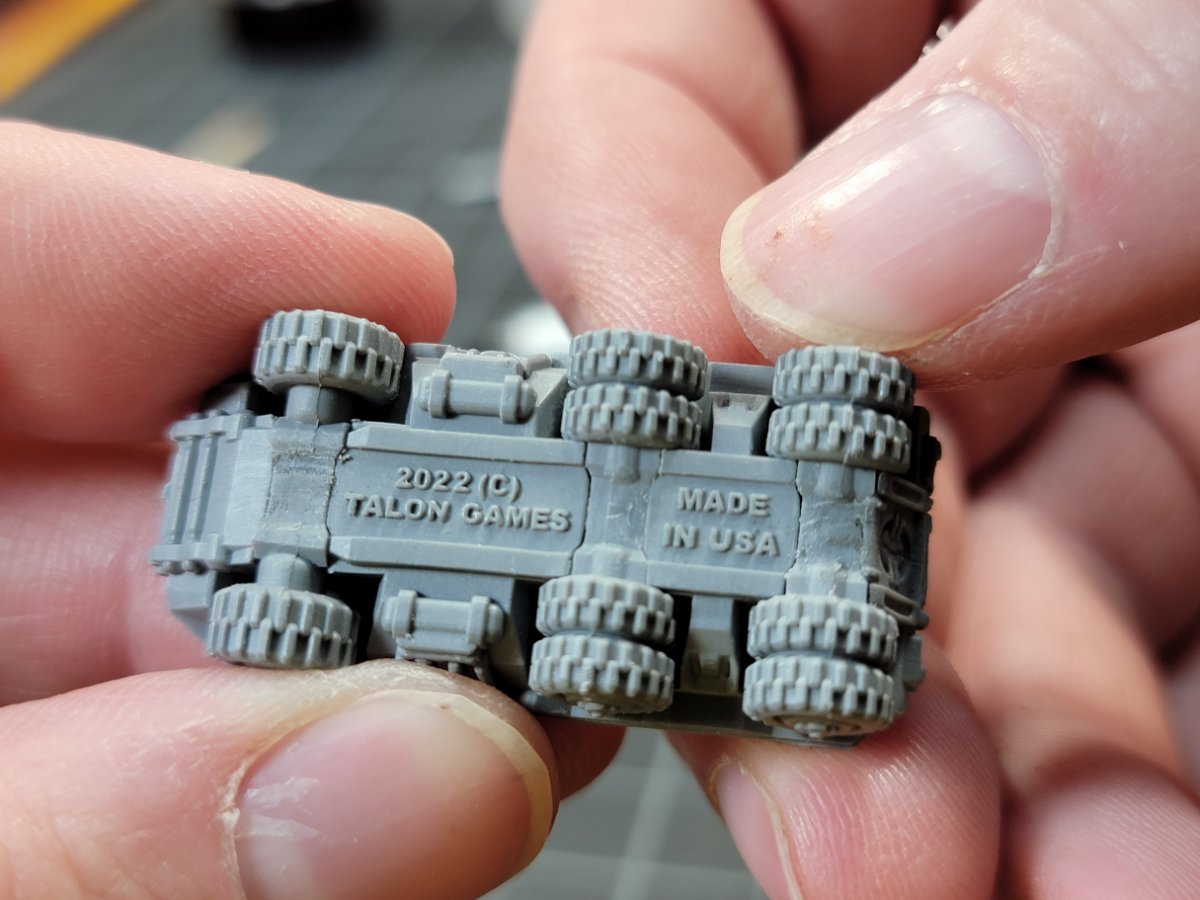
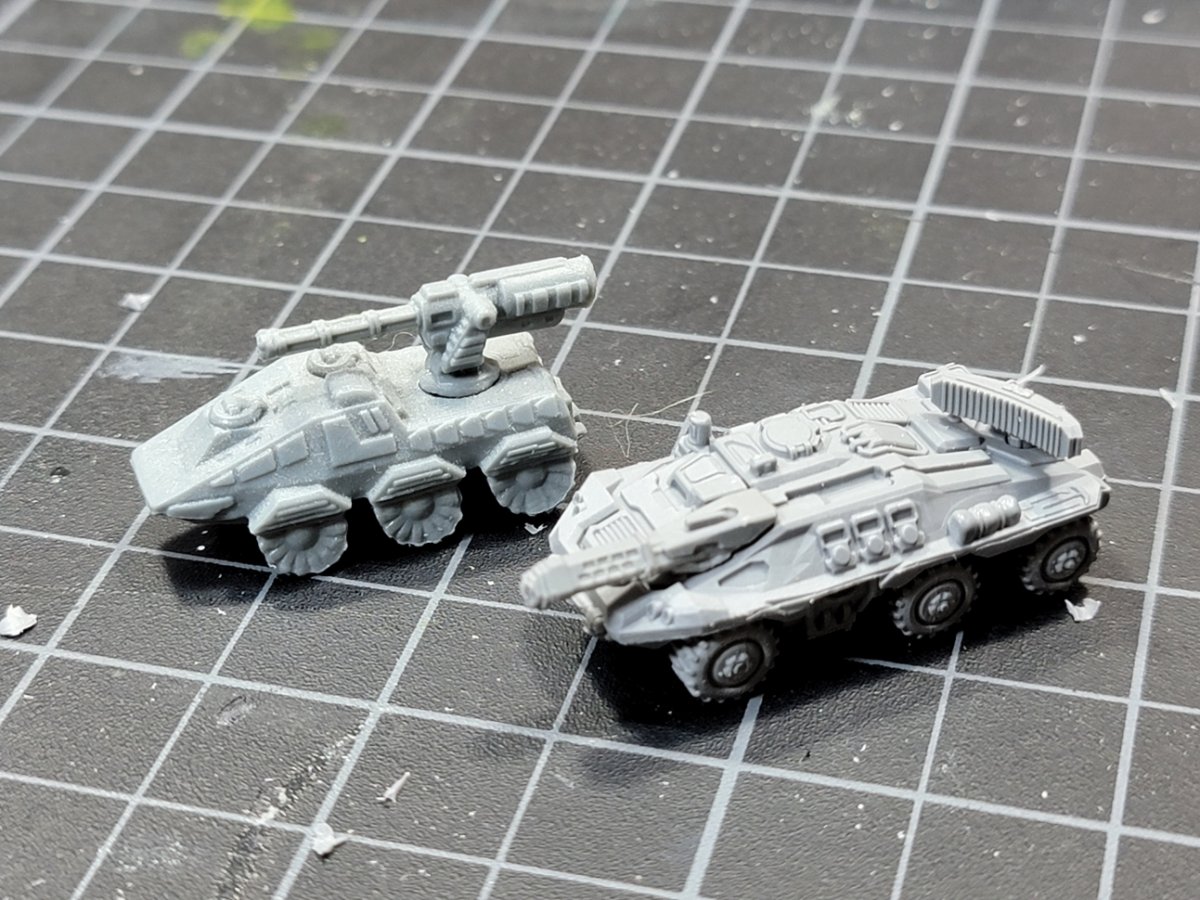
And here we have another of the new releases the Despot B. This is a redo of the KS1 Despot. Its larger, the end pictures will show you the differance. So let's show you the package. In the package you should find 2 hulls, 2 left tracks, 2 right tracks, 2 turrets and 2 sets of GMs. So lets put one together. Here are all the parts you need. First trim off all the extra flashing on the turret. There is also a main gate to remove from the rear. Sorry no pic. Next remove the Gate from the GMs. Then work on the flashing on the Treads and hull. Then separate the treads from the hull. Then remove the main gates. After some cleanup, it's time to assemble. Let's start with the Right Tread. Then the Left Tread. Then we put the GMs on the back of the Turret. Next all you do is add the turret to the hull and you are done. I do not glue mine, what you do is up to you. So let's show some comparison pics of the new and the old Despot. So way more detail, it's a bit bigger than the old. It's easy to assemble. They look great, the pictures can say more about them than I can. The only downside is I may need more of them. Let me know what you think about them down below. Thanks
- 1 reply
-
- 5
-

-
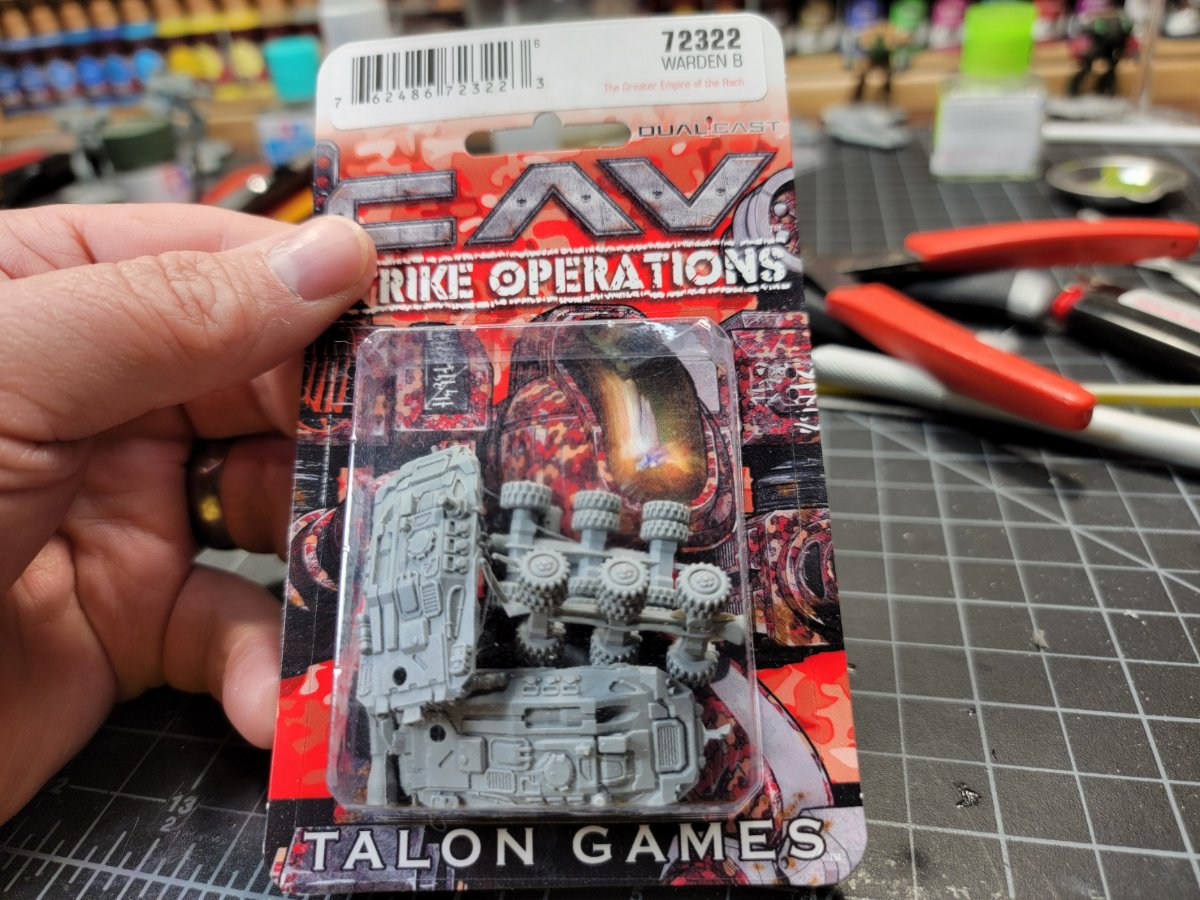
Warden B overview and review (Lots of pics)
TigerWraith replied to TigerWraith's topic in CAV: Strike Operations HQ
Something like this.
-
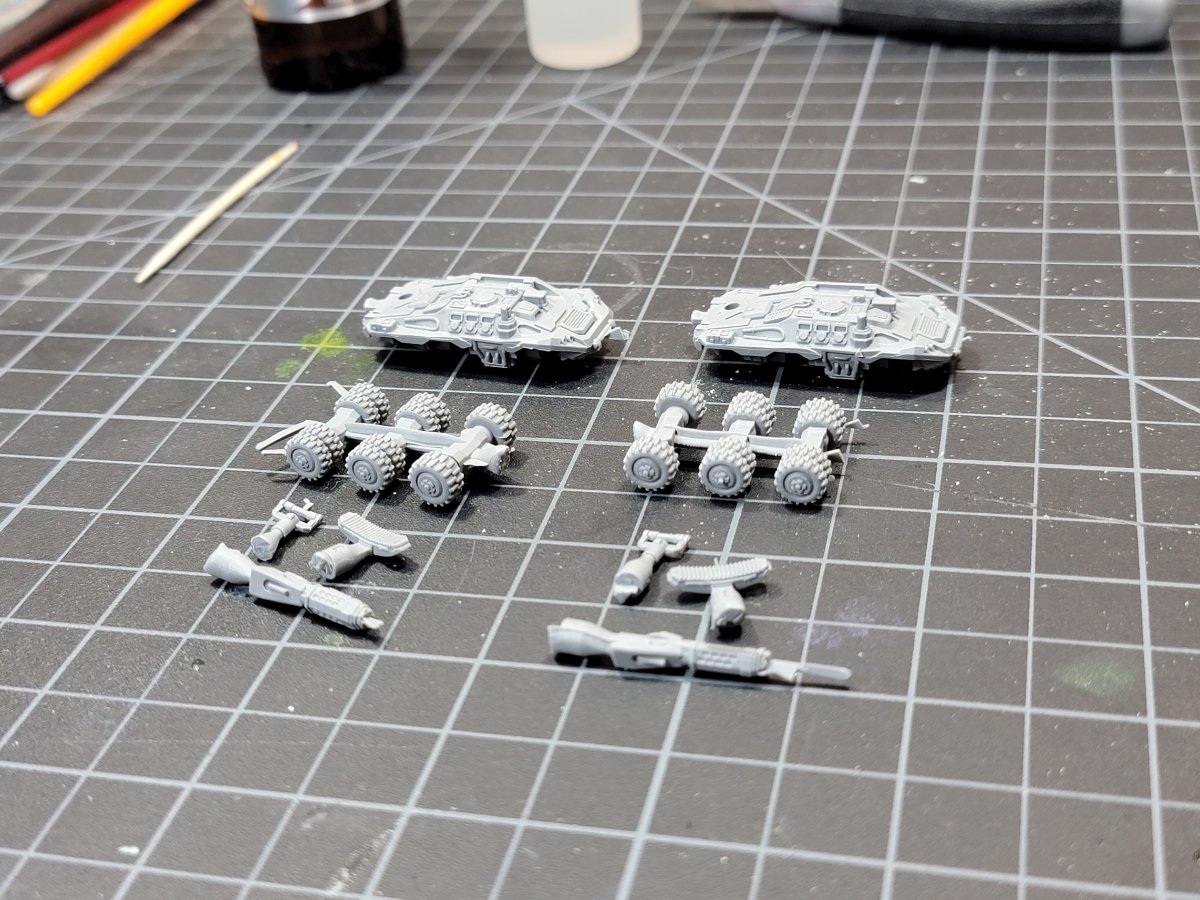
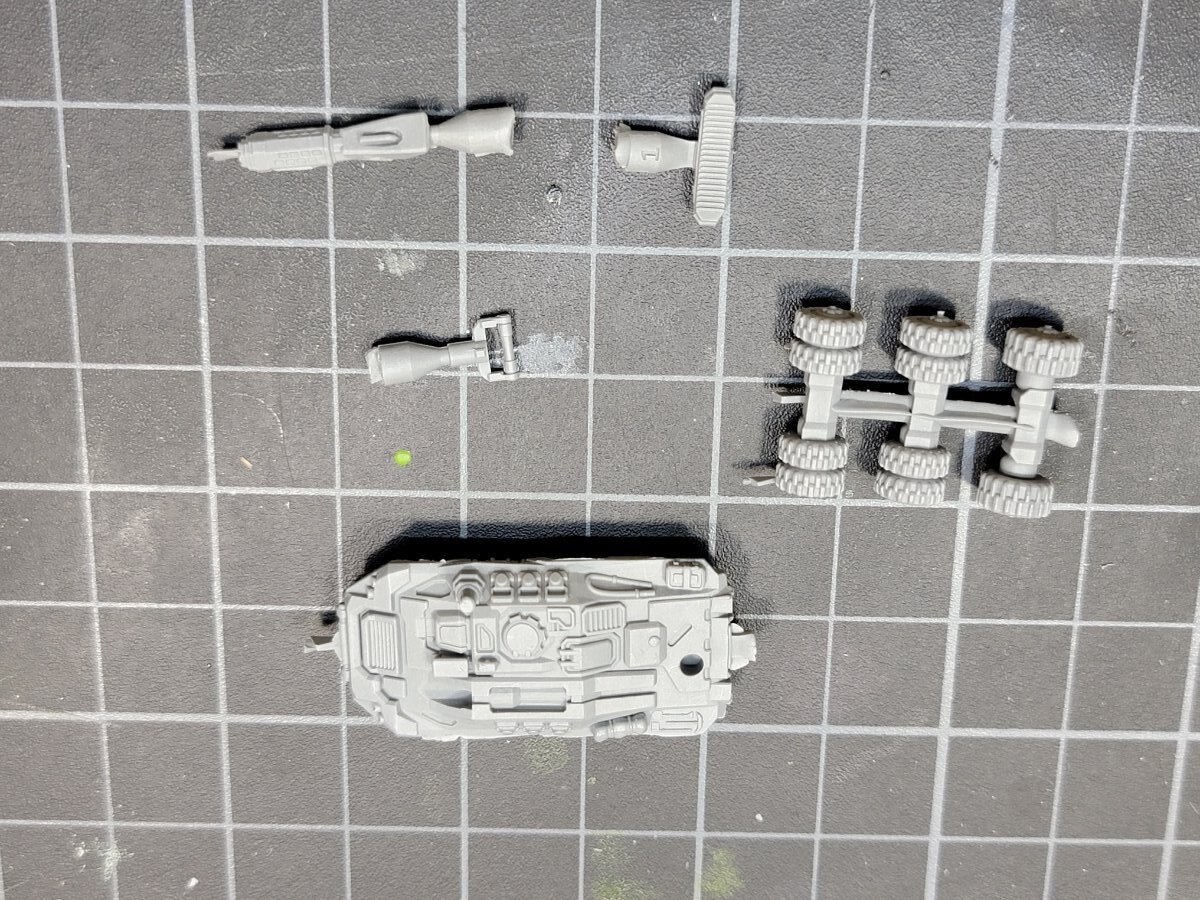
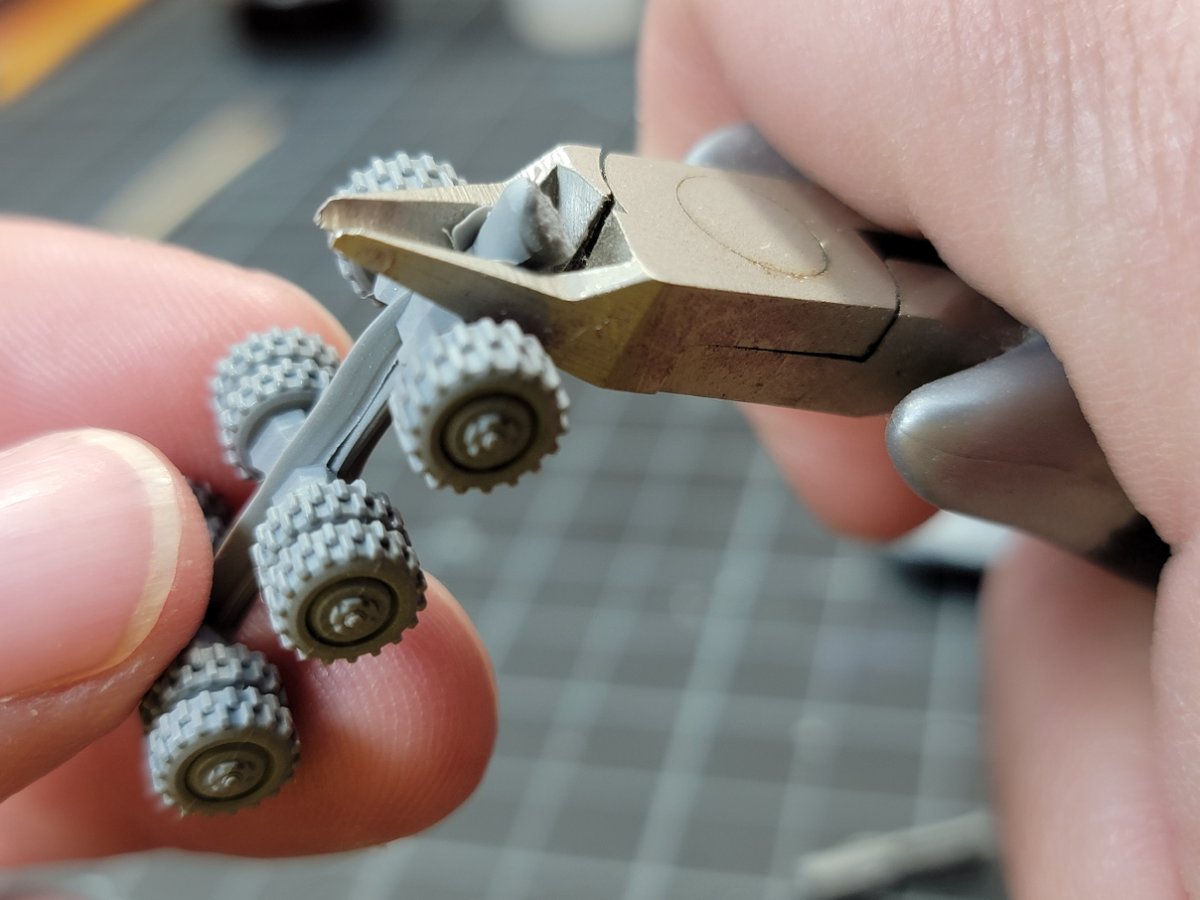
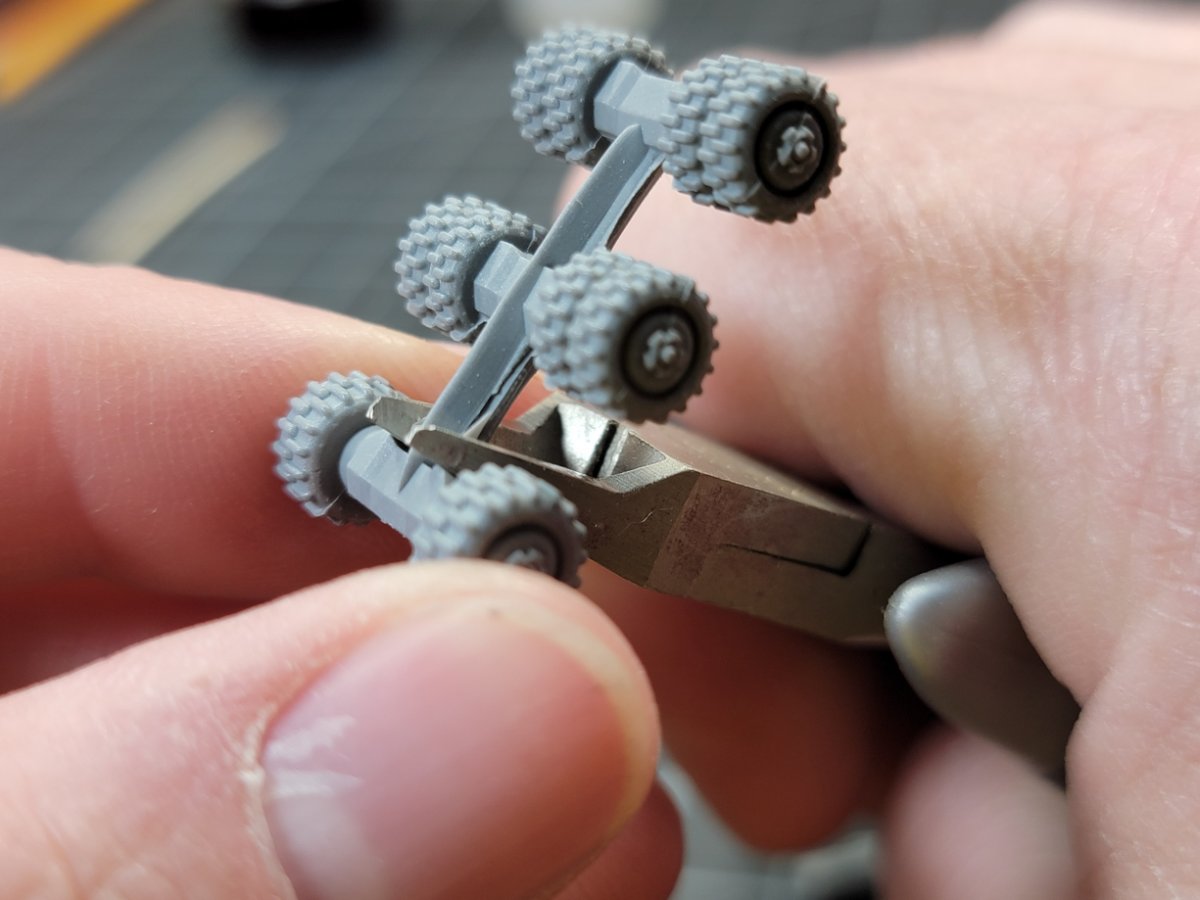
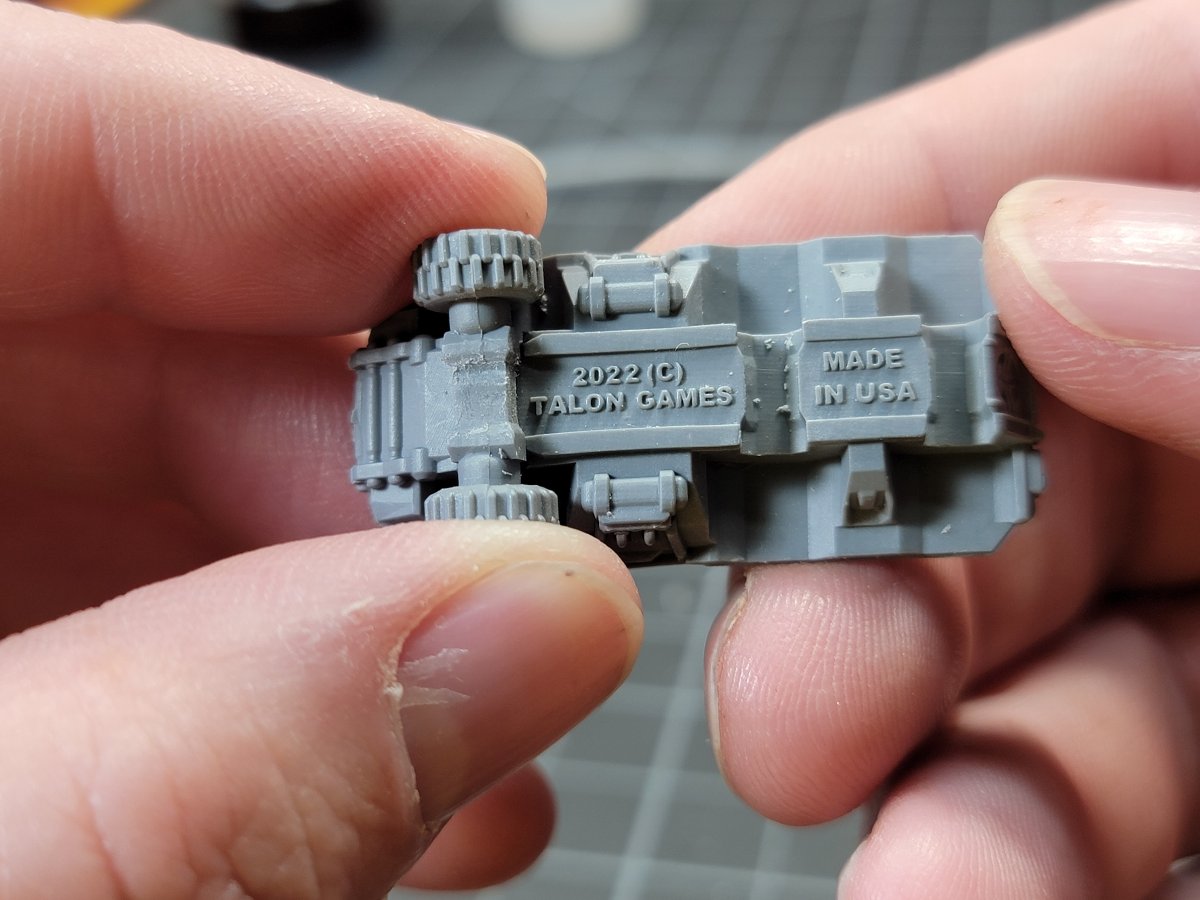
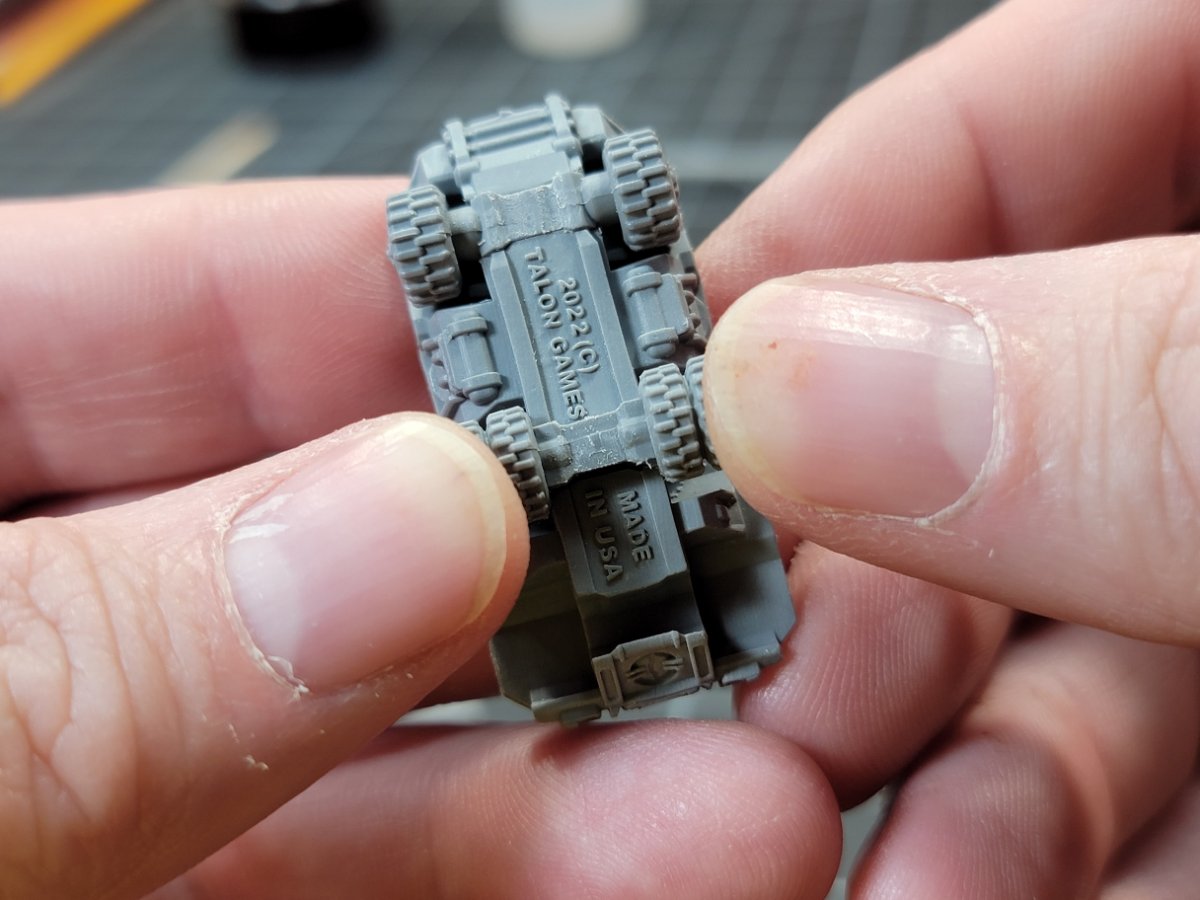
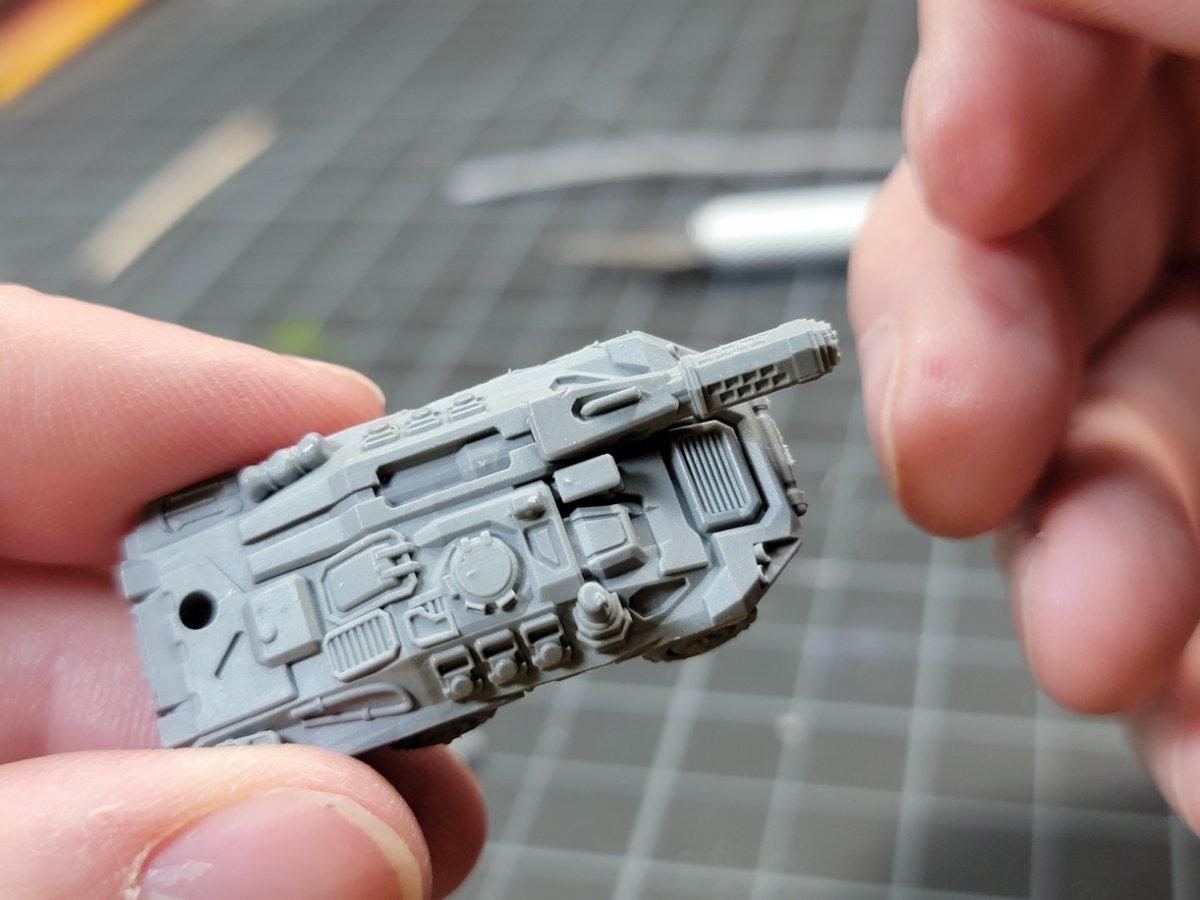
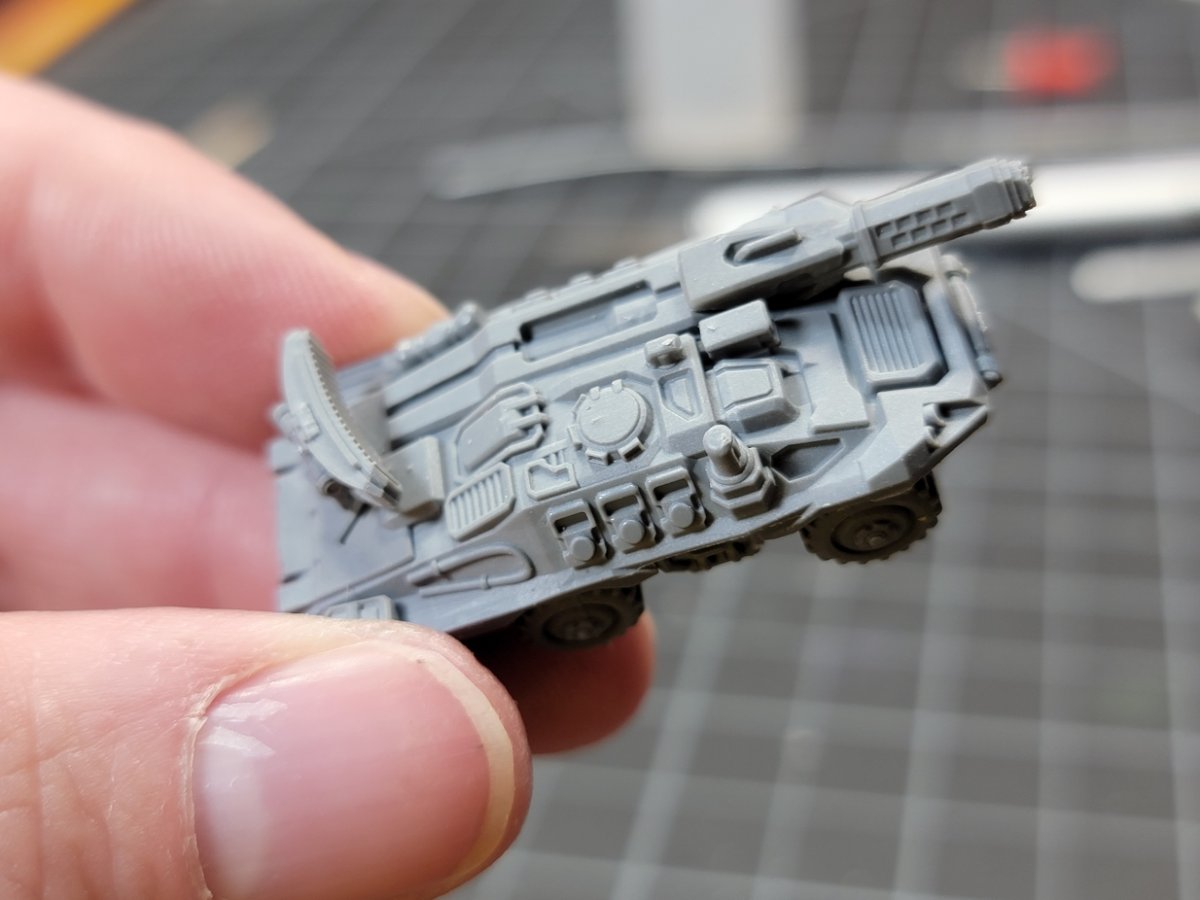
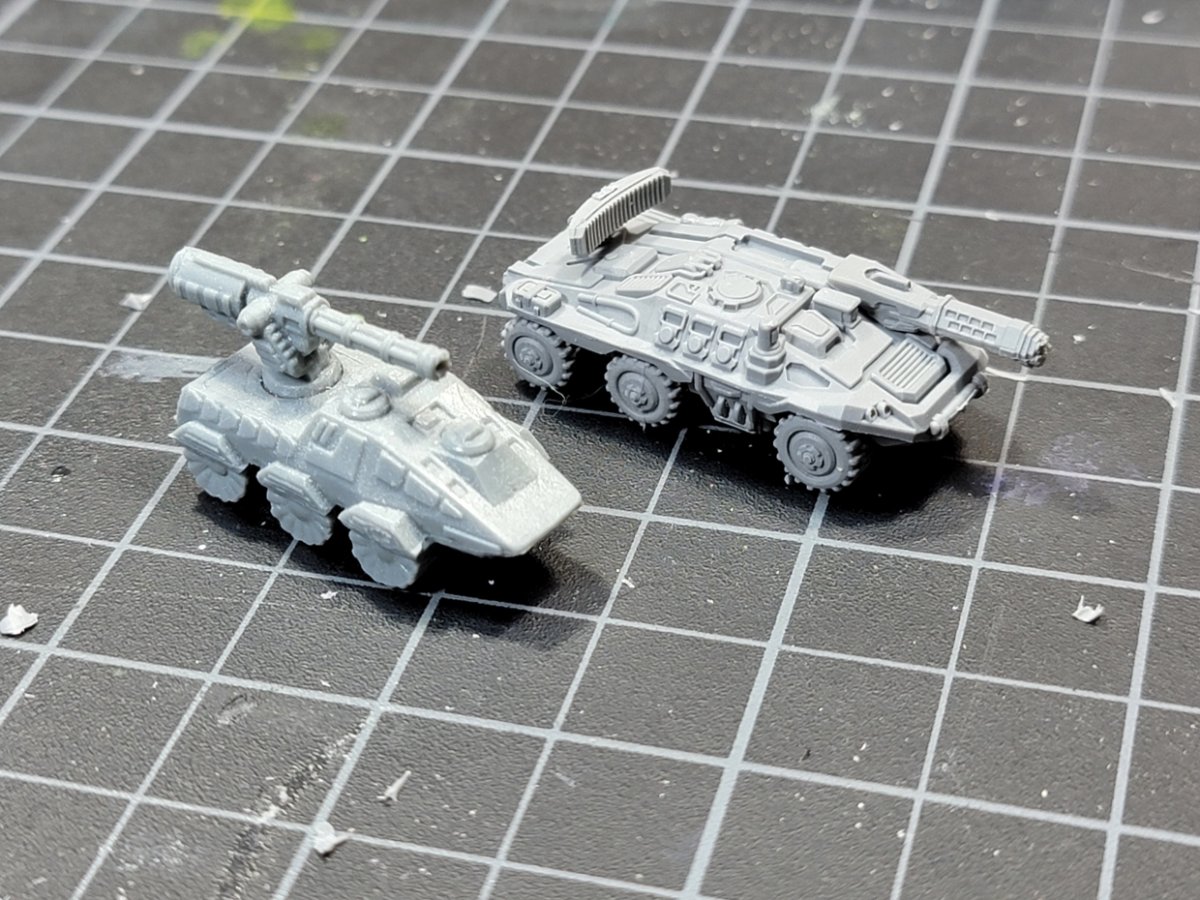
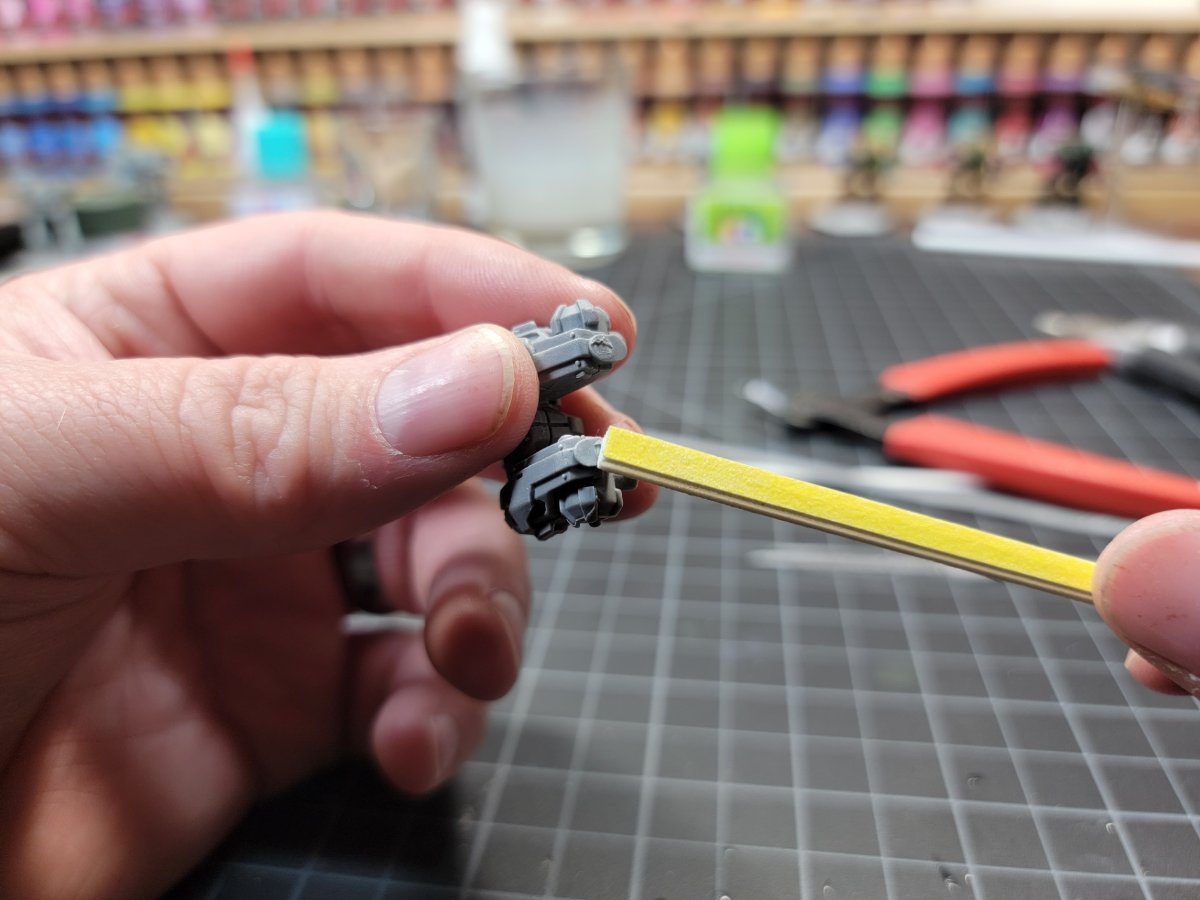
Here is my review of the Dual-Cast Warden B. So this is a new variant of the Warden, that to me is closer to the unit card than the original model was. So lets show off the package. And here is what is in the blister. You get 2 hulls, 2 sets of 3 axels with wheels. (Notice how 1 set is a single wheel on each side while the others are dual wheels on each side), 2 Light RACs, 2 Radar Dishes, and 2 Radar Dish mounts. So what is the Warden B? And how is it different? So this is what CavBoss posted in the Facebook group March 2021. I think it's changed as its now just 1 Light RAC, with the SA Ultra so damage starts out at 3/5. So let's get one of these models cleaned up and put together. Here are all the part you need to make 1 Warden B. So I start off with one of the hulls. And I clip off the extra overflow gates. Next I clean up the Dish Mount. Then I move on to the RAC. I get the overflow gate. Then I get the main gate. Next is the Radar Dish. Now it's time for the Wheels and Axels. I cut the main gate off, then I remove all the axels from sprue. After I have 3 separate axels I clean off the extra parts, because there is no extra space on where you insert them onto the hull. Once I finish that up, I start adding the axels to the hull. I start with the front wheels. These are the ones that only have a single wheel on each side. On this model the clearance between the axel and the hull is nothing, so I opted to not use any glue as I think it will hold without it. If you do use a glue I would use something thin or use a small amount there is not a log of clearance here. First set of Dual wheels go next. Then the last set of dual wheels. Next I glued the Radar Dish to the Dish mount. Next I glued the Light RAC to the hull. Last step is to add the Dish, I opted to not glue mine. And with that I have a Warden B ready for painting. So you want to see how the Warden B compares to the Warden? So in the pictures above you can see the difference. The Warden B has so much more detail than the KS 1 Warden. It's also a little larger as well. In this last picture you can see the pickaxe and other tools on the side of the hull.. The original couldn't show that kind of detail. So my thoughts on it. It is a great model. Didn't take me long to get it together. You do have to watch where you are putting your wheels (I almost put the single wheels on the rear) . I am liking the new Dual-Cast material. It is easy to work with. About the only downside that I have is I have to use more caution when using my hobby knife. The material cuts very easily and if you have a sharp knife you can cut away more than you want. But I will trade that with not having to wait 6 months to a year for CavBoss to get models from over the ocean. Let me know your thoughts and questions. I could really use some pointers to help make these posts better. Thanks
-
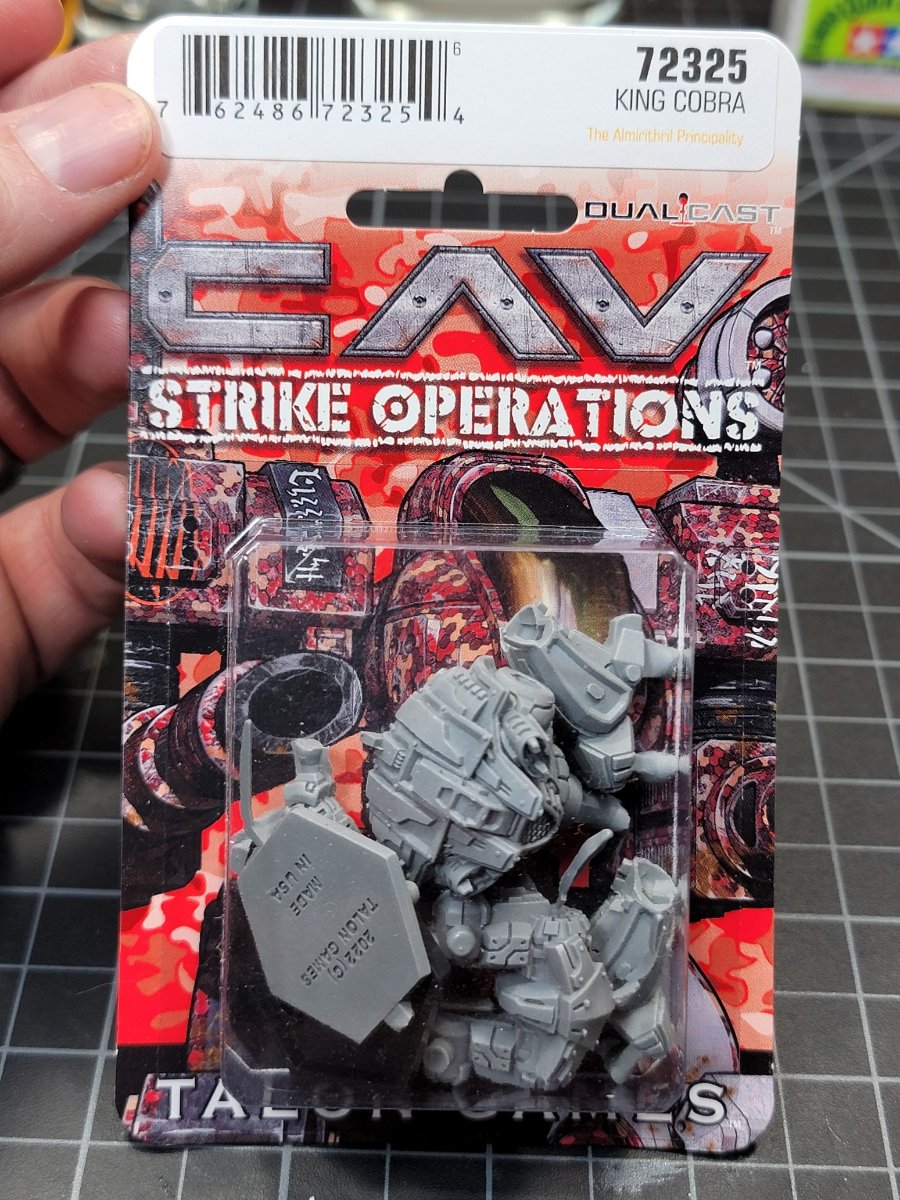
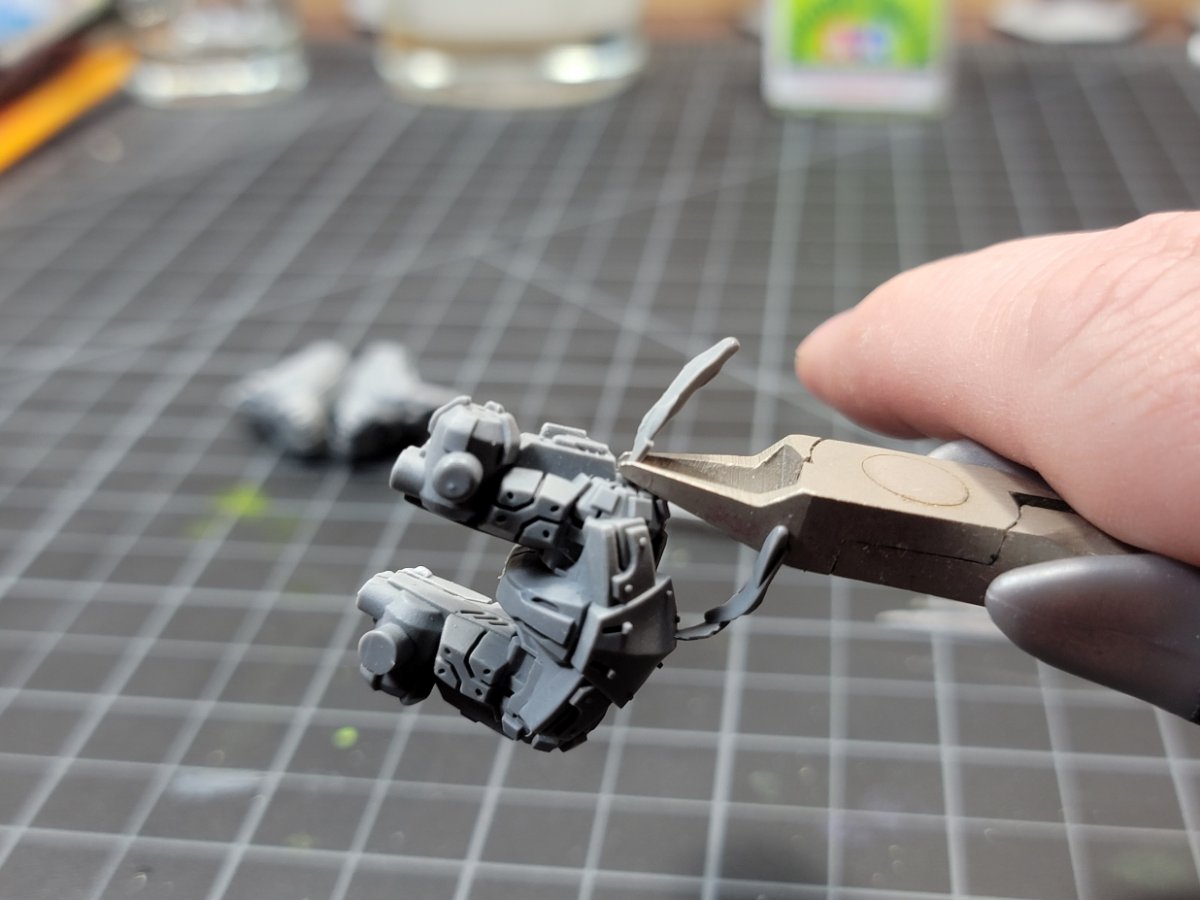
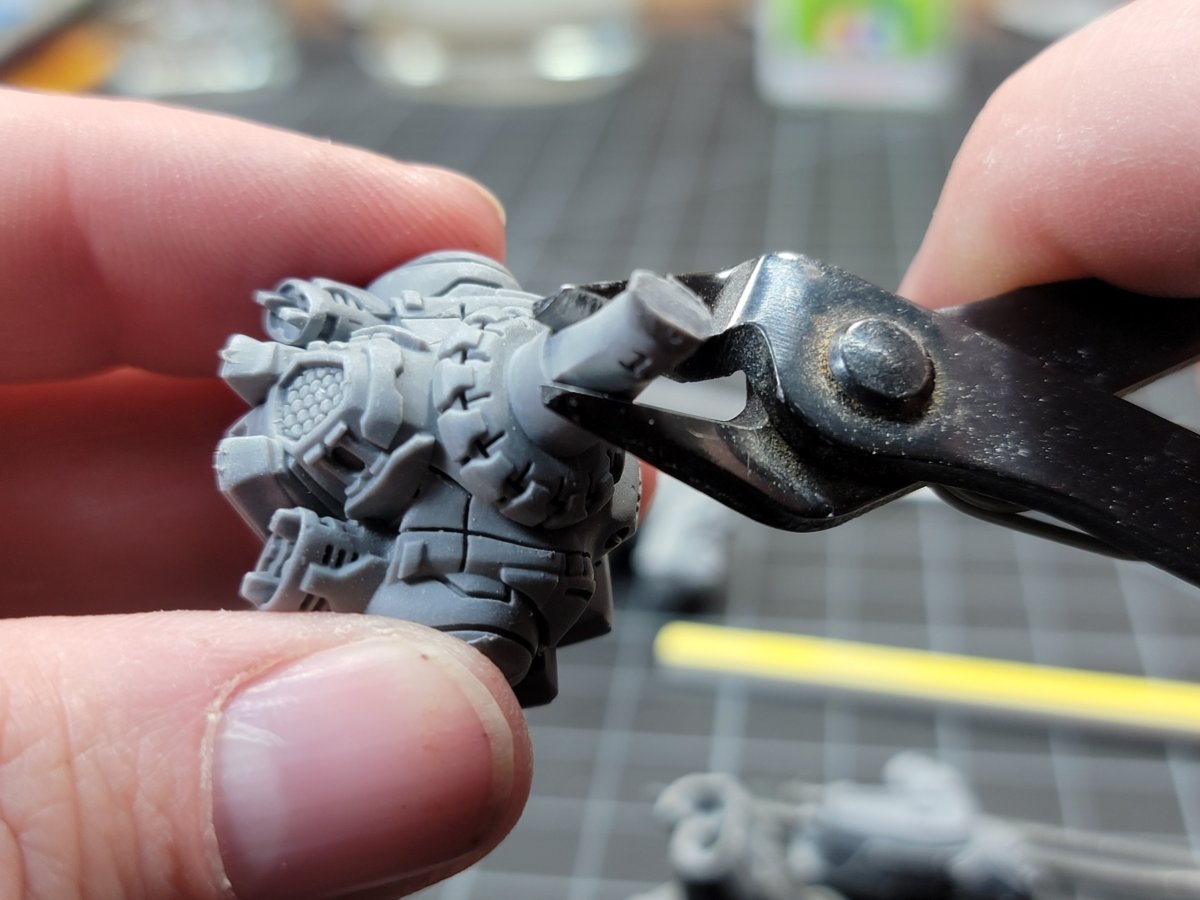
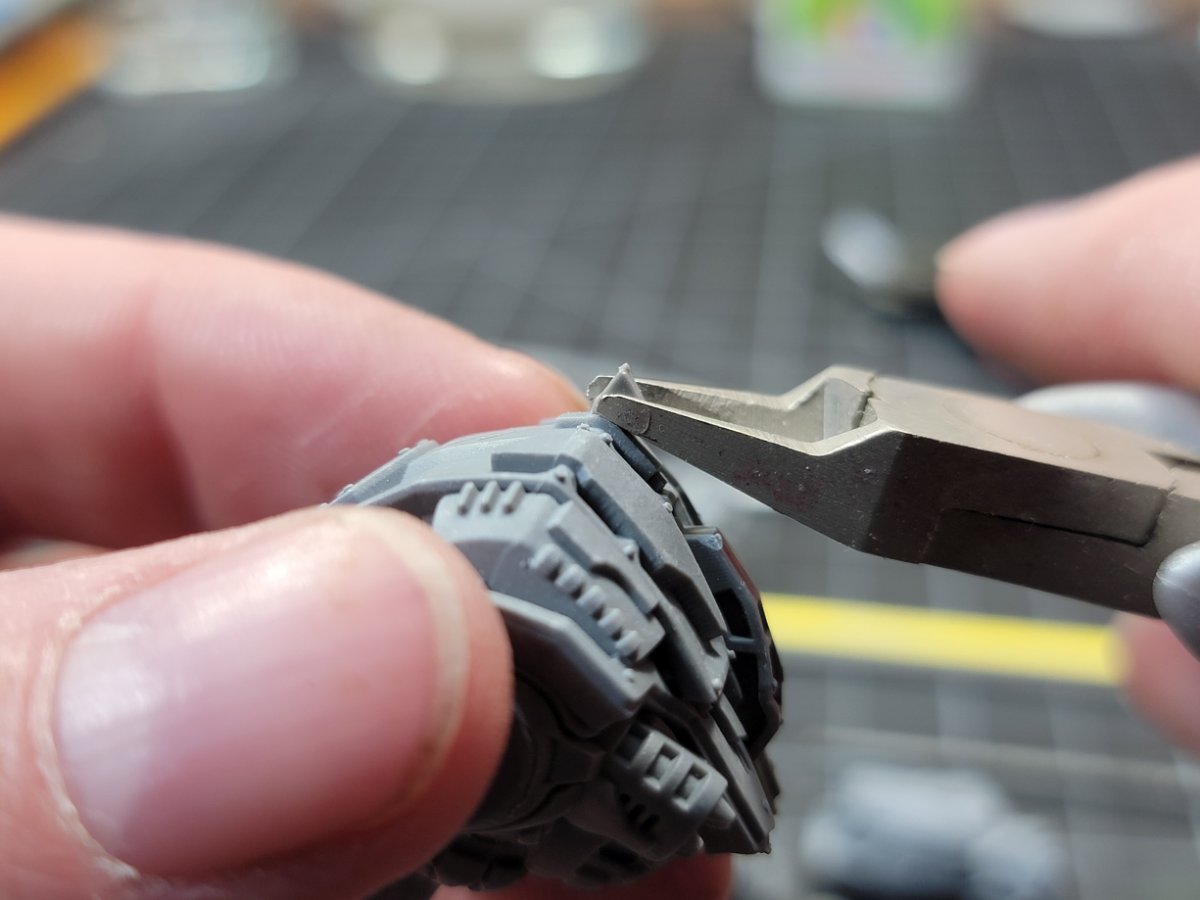
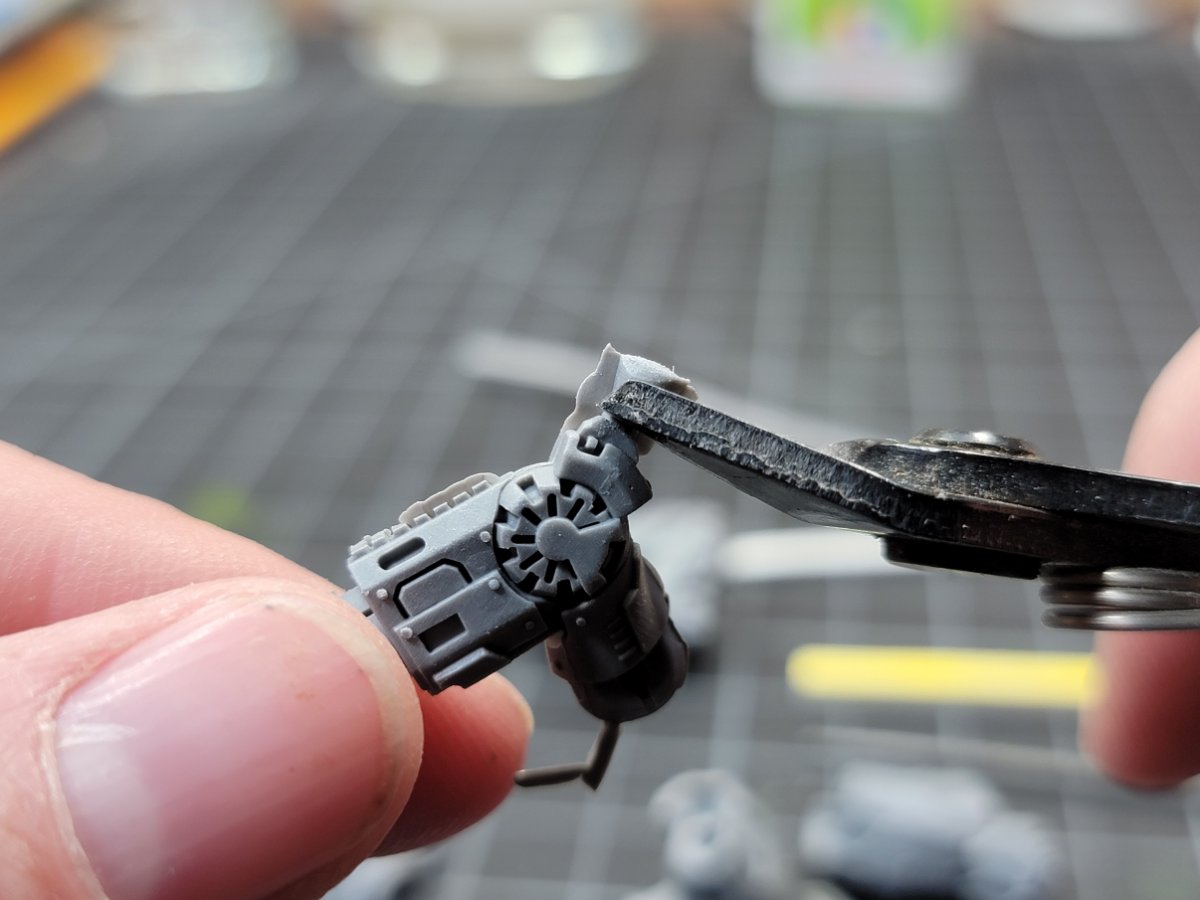
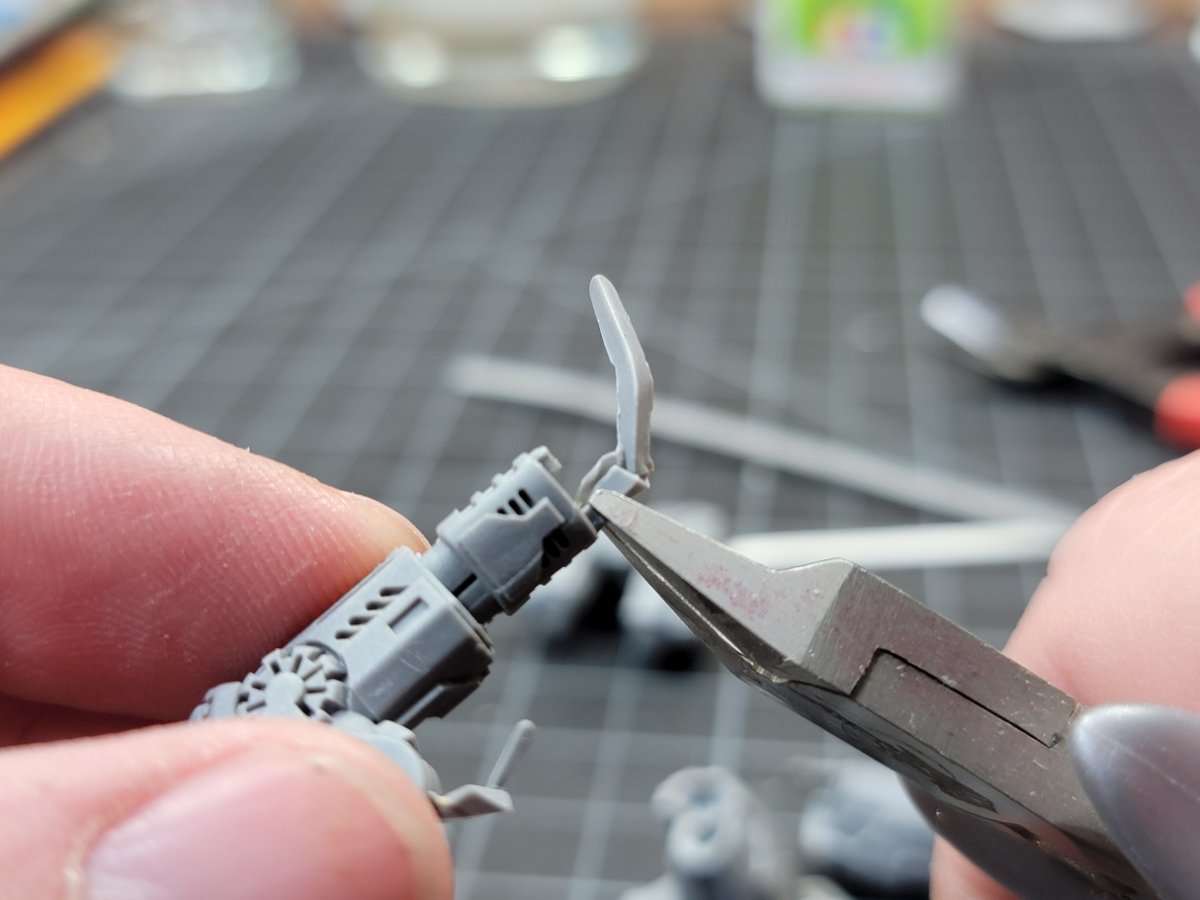
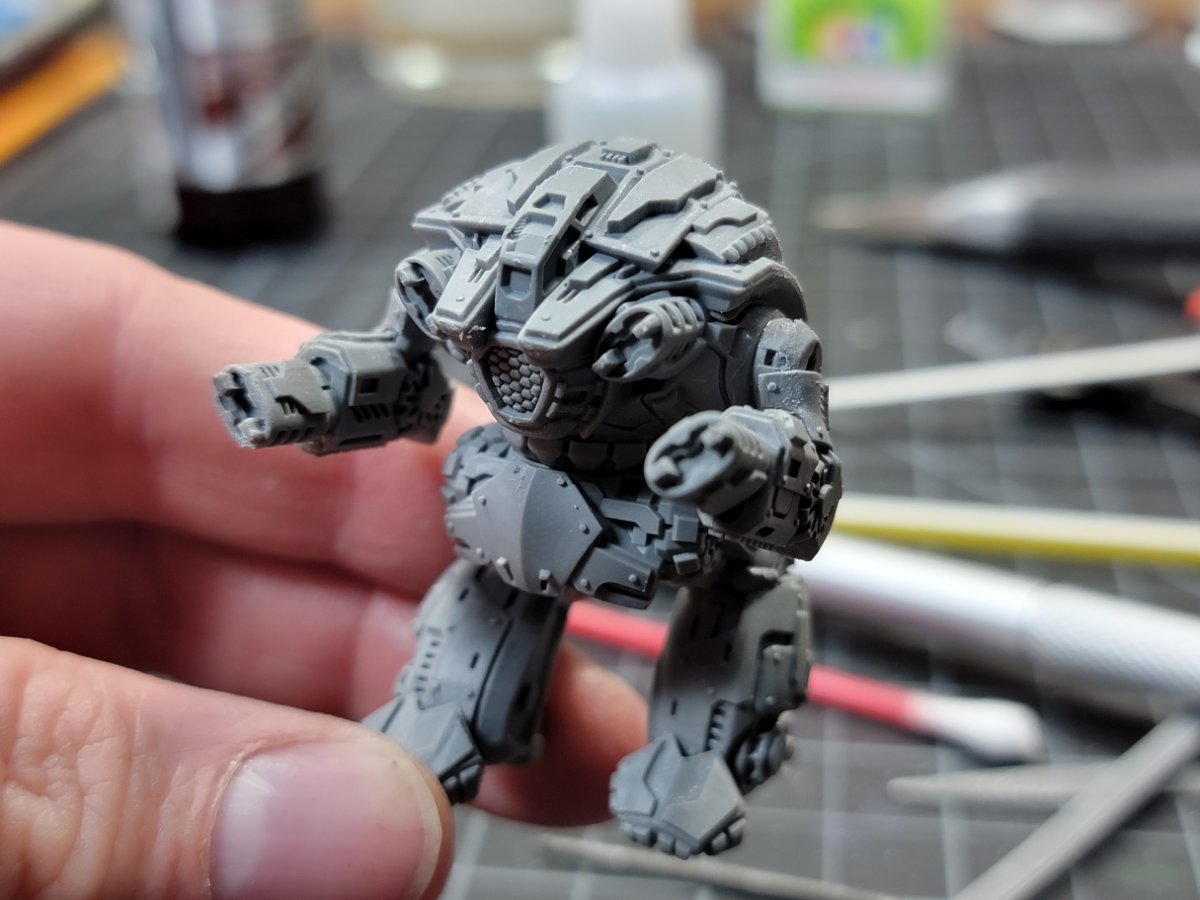
This is my review of the new DualCast King Cobra. Things to be aware of, DualCast is not as rigid as the KS3 material was. It is easier to cut. Also any filing, sanding you want to do, watch yourself, and your details that you do not want to lose. Please read through. If you dont know what the King Cobra is, take a look here. Yep thats right its a DT 8 recon.. So here are all the parts that come in the blister. You get a Left lower leg, Right lower leg, Hip with both upper legs, Right arm, left arm and torso. Now you will notice that there are extra parts on these. Due to the new DualCast process we will see these on some of the newer items. They are molded like metal casts, but its thermoplastic resin. So some of the minor imperfections that we would see with metal we will sometimes see here too. These are most of the tools I use. Some clipers from the hardware store for the larger gates, smaller ones for the small gates and anything else I need to nip off. A sharp hobby knife, a mold line scraper, some files and sanding sticks. So I use my larger clipers to get the big gates, nips them right off. Then I use the smaller clipers to get the smaller gates. Now I take the gates off the back of the upper legs. Then the Smaller gates. Now I use some sanding sticks to help level out where the large gates were at on the back of the knee joint. Didnt work as well as I would have liked so I got one of my files out. You may find some extra bits here and there, if you dont like them then use a sharp hobby knife to remove them. Sometimes I need some speed so I break out my dremel, I have some diamond dremel bits and this one here works great at removing mold lines, and other imperfections. Its not as harsh on the material as well. Once I'm done with the lower legs, and hip parts I move on to the Torso. Found a small piece on top that I felt needed to be removed. Then I went to work on the arms. Once I was done removing all the mold lines and fixing a few trouble spots, just a little bit of CA glue and some CA Accelerator, and it went together like a charm. So overall, I really like the fact that the minis are made in the USA. The details on the new minis are just as clean and crisp as the KS3 minis, maybe more so. The new DualCast is easier to work with in my opinion. I can see lots of conversions in the near future for me. I can never have enough parts.... I do dislike having to deal with mold lines but with the tools I have it makes dealing with those easier to handle. It is odd to me that this is a plastic mini but it has some of the same issues as a metal mini. I'm sure that is because they share some similar steps. I ordered 2 of the King Cobras. My first one did not have a lot of issues just the normal clean up for me. Second King Cobra did have some pesky mold lines I had to deal with on one of the arms, the one with the extra flashing you see above. My dremel and hobby knife helped me to remove those. One of the lower legs did have a detail that didnt quite get filled out. The lower legs have 3 raised squarish details and on one of the legs one of the raised parts was smooth and glossy kind of like it didnt get quite enough of the material to it. I was able to square it up and remove the glossiness with my tools. All in all though I would have to say I am quite happy with the model. Yes they may have issues that needs some creative thinking or some elbow grease to get worked out. At this price point I am happy to do that. Some may use the slight imperfections to show as battle damage, I dont have a lot of luck doing that myself so I just do what I can. All I can say is im not paying a "Preimum" price for a "Preimum" model that has issues. So tell me what you think. I may do more of these for the other new units. Thanks
- 1 reply
-
- 3
-
-
Malvernis unit in progress
TigerWraith replied to TigerWraith's topic in Works in Progress: Painting
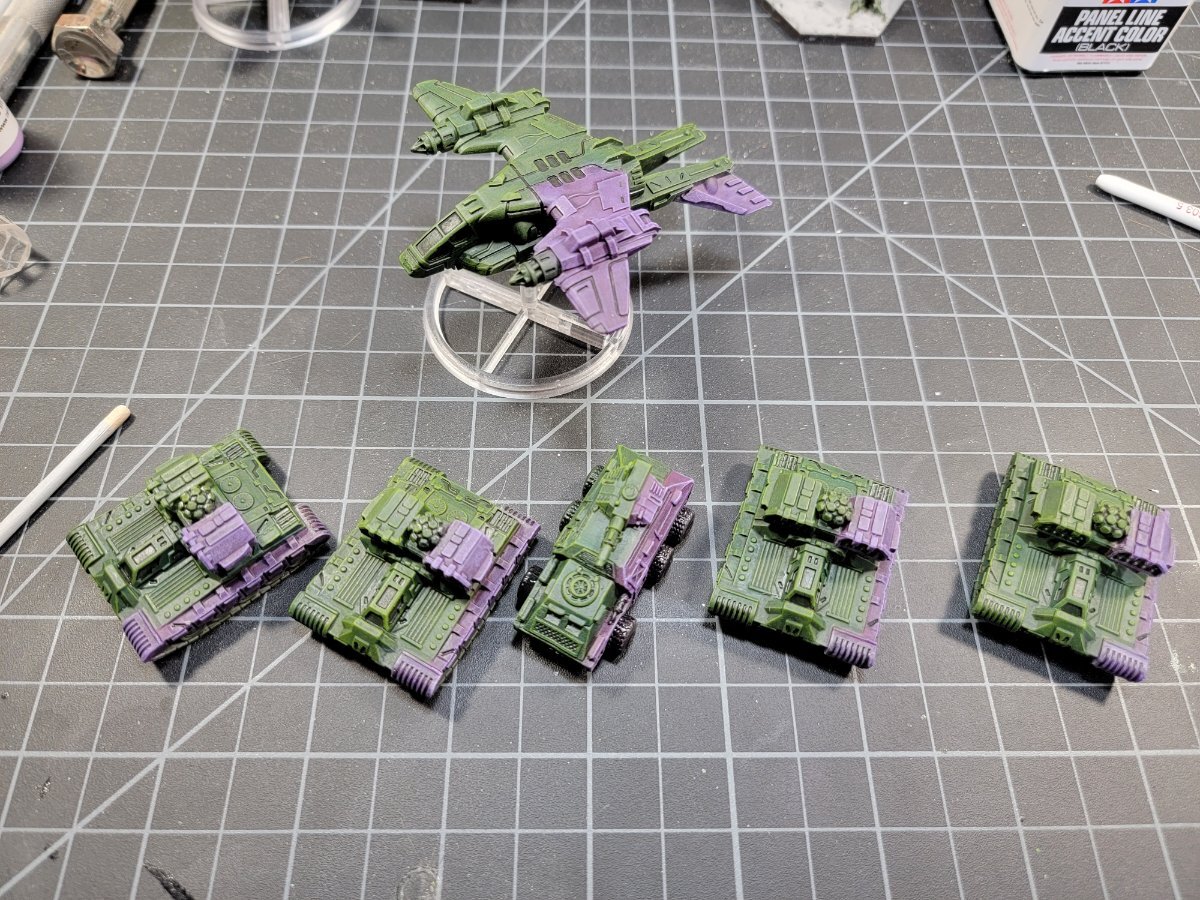
Now working on the Attack Squad.
-
Malvernis unit in progress
TigerWraith replied to TigerWraith's topic in Works in Progress: Painting
I dont think so. I am using white on the missile tips. Once I get everything on the same type of base like the Gloom and Pillager I think it will look better. -
Malvernis unit in progress
TigerWraith replied to TigerWraith's topic in Works in Progress: Painting
-
Malvernis unit in progress
TigerWraith replied to TigerWraith's topic in Works in Progress: Painting
-
Malvernis unit in progress
TigerWraith replied to TigerWraith's topic in Works in Progress: Painting
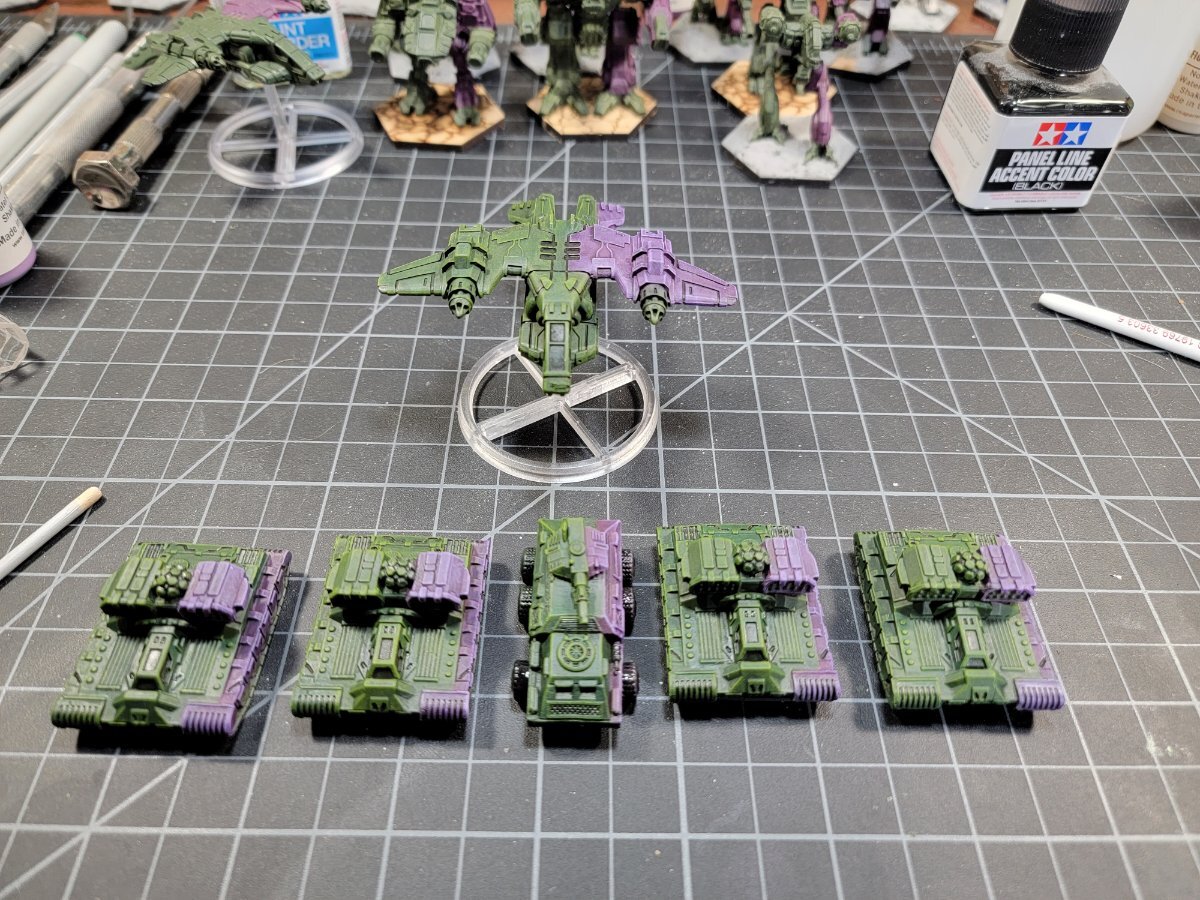
Some more progress...
-
Malvernis unit in progress
TigerWraith replied to TigerWraith's topic in Works in Progress: Painting
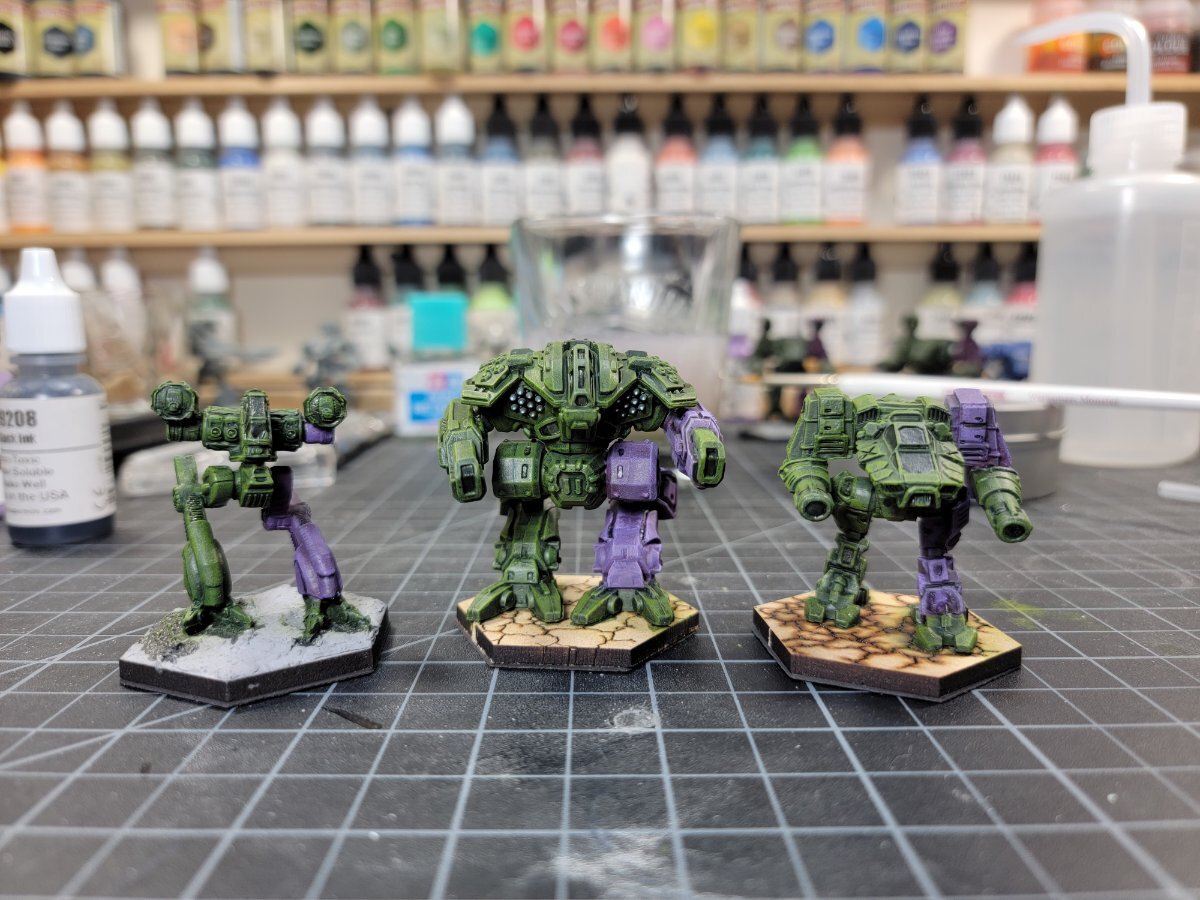
Starting to look like a unit now.
-
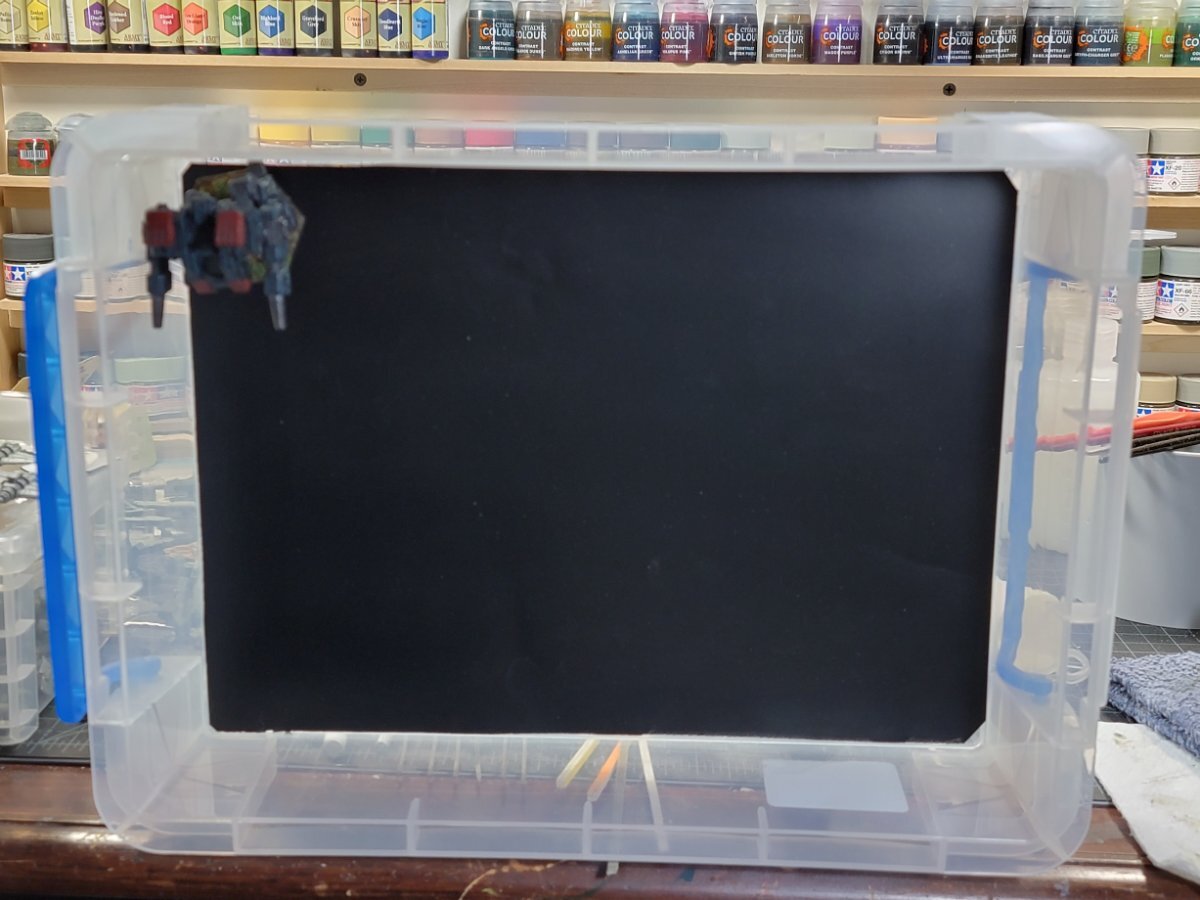
So it seems Magnetic cases are becoming the norm, and I like it. Foam cases just don't work for me anymore and can sometimes end up causing problems. So what to do. A few months ago I watched a video by Dunan Rhodes (yes the two thin coats guy) and he showed what he uses. 4L and 9L storage boxes from Really Useful box company. I found some at Office Depot and I loved them. This does a couple of things for me. One, it makes storage of my minis easy because everything can stack on top of each other. I can see what it is that is in the box. It also keeps dust and my cats away from my minis. I also have some storage boxes that I had found at Walmart/Sam's Club. These are about the same size as the Really Useful boxes but they are different.. So look around you may be surprised at what you can find. Duncan used magnetic sheets and I will be as well as I do have some, but I wanted something that would hold a bit more as I do have some metal minis. So I found some 24 in. x 36 in. Galvanized Steel Flat Sheet at Lowes, Home Depot has some too. I used a pair of metal cutting scissors and I cut the steel down to the sizes I needed for my boxes. Once the metal was cut to size (watch out cut metal is sharp) I used 150 grit sandpaper to sand one side of the metal. This was done so I could spray paint it. I used Flat black, then went over the black with some matte varnish. You can use super glue to attach the metal to the box, but any twisting of the box and the bond will break. So I used Mounting strips from Scotch mine said they could hold 30 lbs. I think Scotch has some 12 lb as well. (If you do use CA Glue and the magnetic sheets, leave your lid off for a day or you will end up with a white power on the inside, and do not store any minis while the CA glue is curing). The mounting strips were used as I would not need to wait for any glue to cure. Once you are at this point you just need a way to secure your minis to the bottom. There are a couple of ways to go about it. You can use rare earth magnets in the bottom of your minis if the base will allow you to glue one there. Litko also has magnets you can stick to the bottom(of flexible steel if you use the magnetic sheets) and the cost of these are very reasonable. After you have done this step then you are ready to go. List of materials needed: 4L Document Storage Box (Link to really useful but there are other places with these look for A4 Document Storage Box) https://www.reallyusefulproducts.co.uk/usa/html/onlineshop/rub/b04_0litreUS.php 9L Storage Box https://www.reallyusefulproducts.co.uk/usa/html/onlineshop/rub/b09_0litreUS.php 24 in. x 36 in. Galvanized Steel Flat Sheet https://www.homedepot.com/p/Master-Flow-24-in-x-36-in-Galvanized-Steel-Flat-Sheet-GFS24X361P/202191776?fbclid=IwAR03eS7B6jFPAjiz0PdacqsUPv1rNkVATDJVkKYAZrfwKaxTkqJTl-wV42U Metal cutting snips https://www.homedepot.com/p/Wiss-9-3-4-in-Compound-Action-Straight-Cut-Aviation-Snips-M3RS/100060795 Measuring tool and Square are very useful especially if they fit in the box. Mounting Strips https://www.scotchbrand.com/3M/en_US/scotch-brand/products/catalog/~/Scotch-Mount-Extreme-Double-Sided-Mounting-Strips/?N=4335+3292126606+3294529207&rt=rud Rare earth magnets or add on magnets from Litko https://litko.net/collections/miniature-bases-and-base-bottoms?pf_t_material=basematerial%3AMagnet%3A+0.030+inch&pf_t_shape=baseshape%3AHexagonal&pf_t_size=basesize%3A40mm Or Flexible Sheets from Litko if you used the Magnetic Sheets on the bottom of your box. https://litko.net/collections/miniature-bases-and-base-bottoms?pf_t_material=basematerial%3AFlexible+Steel%3A+0.025+inch&pf_t_shape=baseshape%3AHexagonal&pf_t_size=basesize%3A40mm If you have any questions, or suggestions let me know. Thanks
- 1 reply
-
- 2
-
-
Malvernis unit in progress
TigerWraith replied to TigerWraith's topic in Works in Progress: Painting
Day 2
-
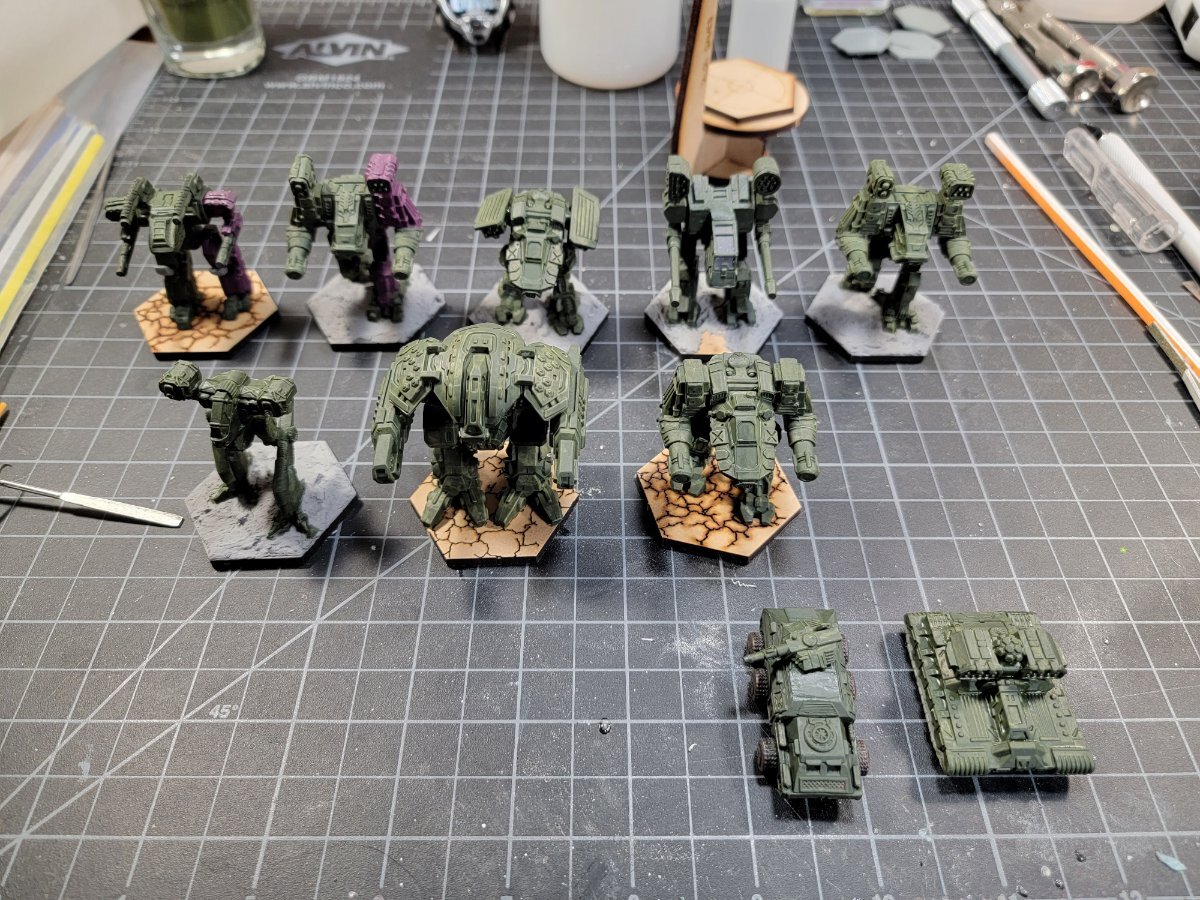
Start of my Malvernis unit getting some color. Still trying to flush out the scheme.
-
Watch what you use for primer on the KS1, 2 and 3 figures. Any spray that has more than 50% acetone in it will cause the models to become tacky to touch no matter if you wash or don't wash before you prime. If you do not know look for the MSDS sheets of the paint you want to use for primer. Rust-oleum puts 25-50 % acetone in their sprays. So guess what that means. You can buy 2 cans of the same paint and if one has 28% acetone it will work great on the CAV models, but if you get one that is closer to 50% or maybe just a little over your going to have a model that even if it stays out in the sun all day will be tacky. I primed a couple of models in Rust-oleum Camo Sand and they stayed out for 2 hrs. Were tacky to the touch. I let them sit in the house for 2 months and were still tacky to the touch. When I striped the primer off the tackiness went away. A favorite to use is Tamiya Surface Primer. It only has 1-5% acetone in it. This is why it works so well. Army Painter is another that people like, it also has less than 50% acetone in its cans. Vallejo Hobby Sprays appear to have no Acetone in them. GW Sprays - some are over 50% some are under, but you have to email GW to get the MSDS sheets. So best advice is either get the msds of the paint you want to use, or test the spray on any extra sprue, or the underside of the part that goes into the included base.. If you do end up with a tacky model you can always use testors dullcoat to help take that away.. If you have any questions let me know. I've not tested the DualCast yet. I tend to use the Tamiya Colors Acrylics as my primer/base coat as its an alcohol based acrylic and adheres to the plastic just fine.